-
cigarette smoke odor removal, fire damage restoration, lexington, kentucky, mold inspection company, mold removal service, smoke odor removal, Water Damage, water damage cleanup, water damage cleanup company, water damage mitigation, water damage mitigation company, water damage restoration, water removal service near me, water restoration company
7 Hidden Signs of Water Damage in Your Home or Business
Serving All Of Central Kentucky


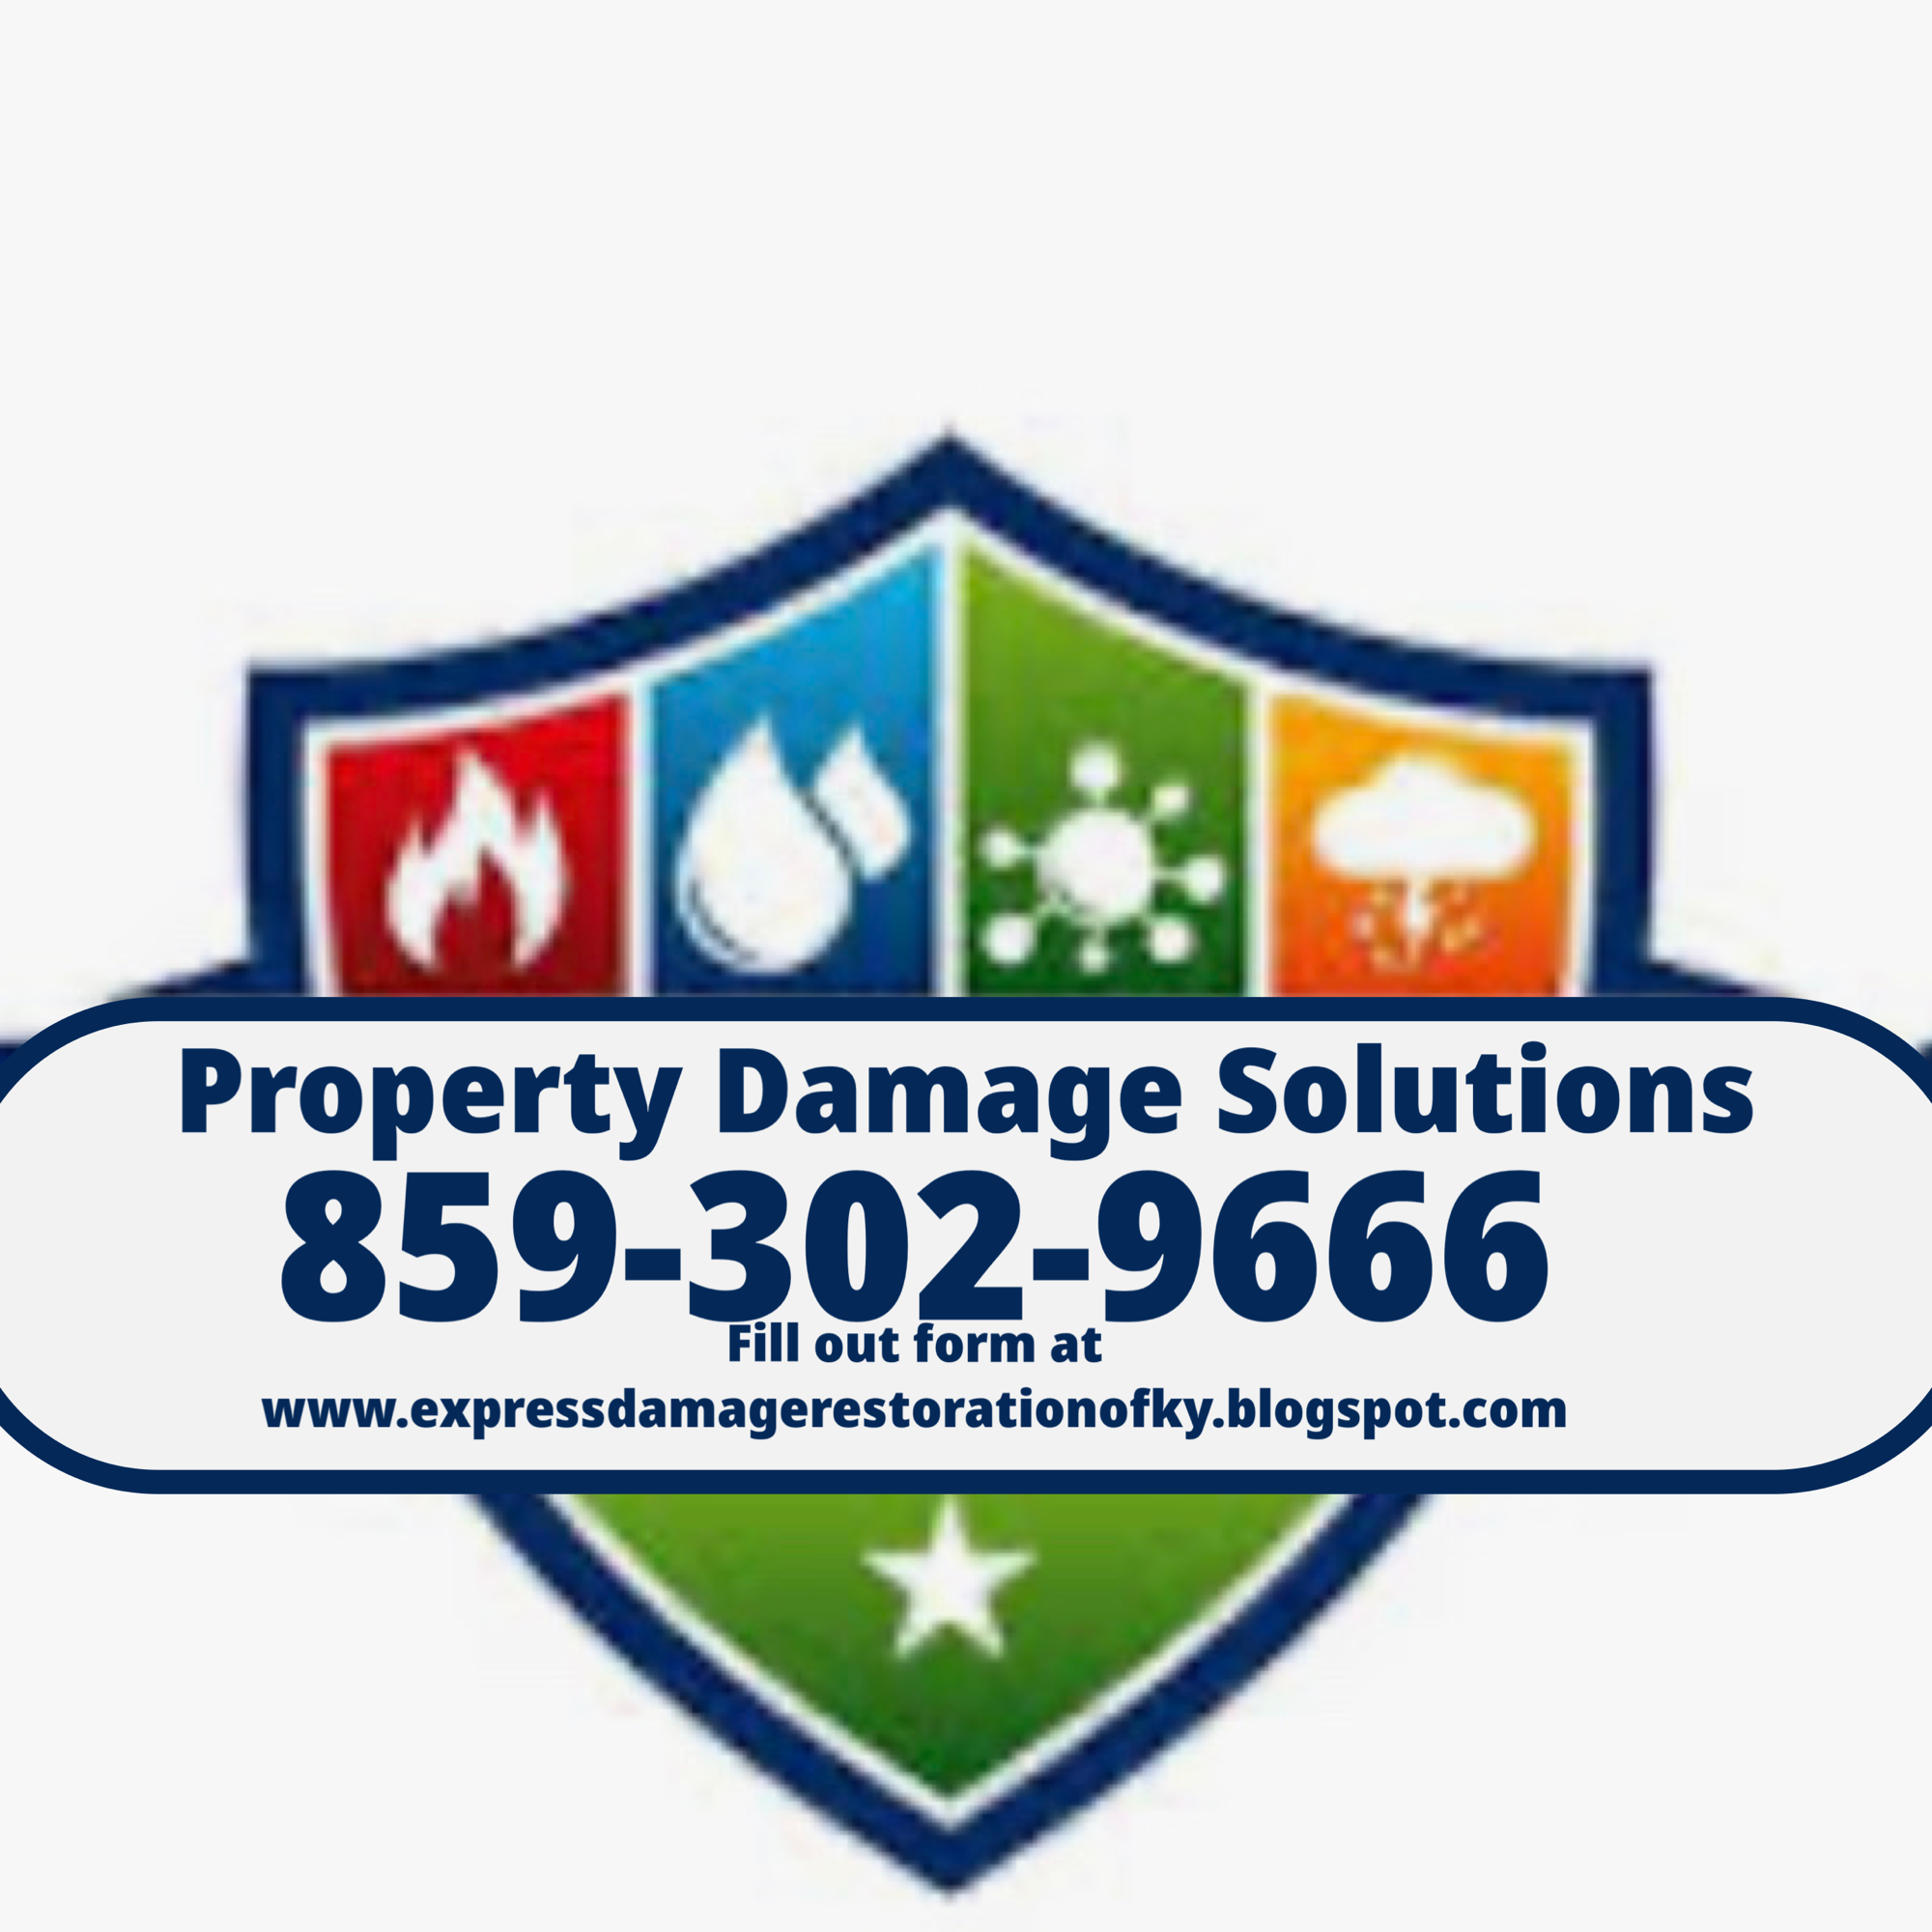
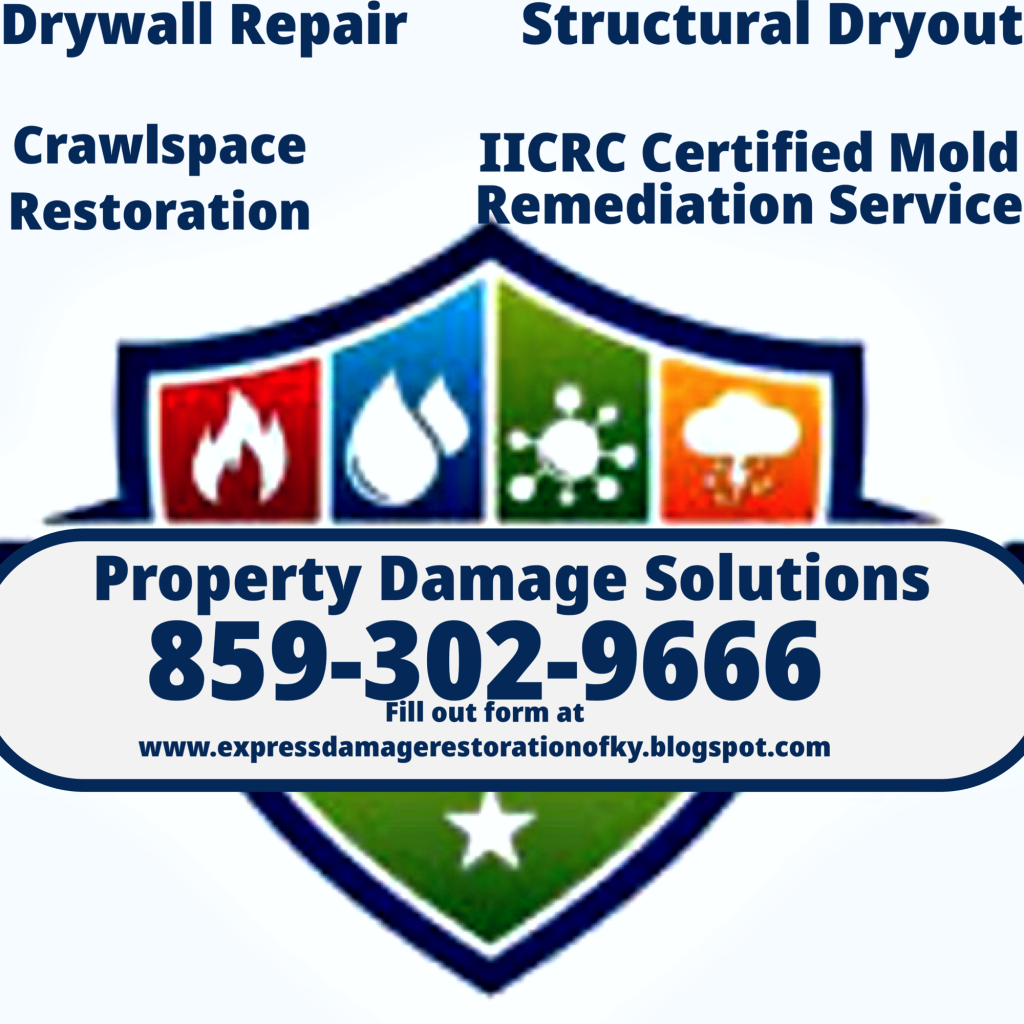
We are an IICRC Water Damage Restoration Master Restorers

Book Now

We Are Also IICRC Certified Master Fire Damage Restorers Click To Book
24 HR Water Removal Services Click To Call
-
The Importance of Exterior and Interior Waterproofing

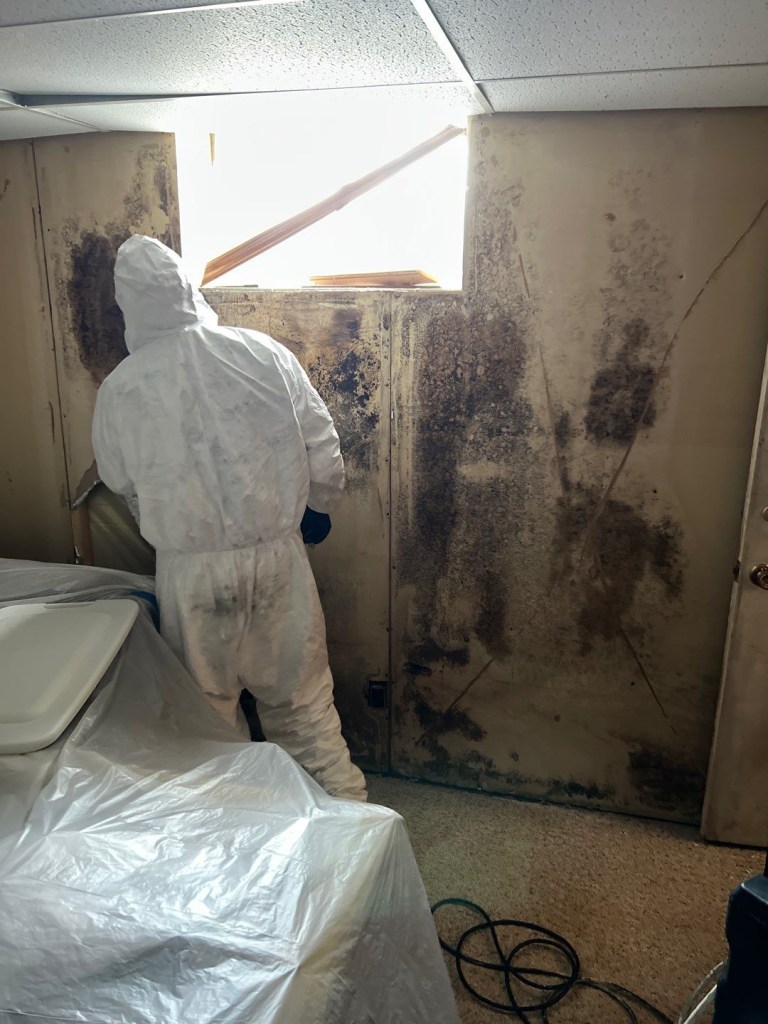
This basement was below grade, the waterproofing product used to seal the exterior when constructed, had degraded and delaminated over time. The Importance of Exterior and Interior Waterproofing
Waterproofing is an essential aspect of maintaining the structural integrity and longevity of any property. Whether it’s a residential home, a commercial building, or an industrial facility, ensuring that both the exterior and interior are well-protected from water damage can save you significant time, money, and stress in the long run. Here’s why you might need exterior or interior waterproofing and how it can benefit your property.
Understanding Exterior Waterproofing
Exterior waterproofing focuses on protecting the outer structure of a building from water infiltration. This type of waterproofing is crucial for several reasons:
- Preventing Structural Damage: Water seepage can weaken the foundation, leading to cracks and structural instability. Exterior waterproofing helps keep water away from the foundation, preserving its strength and durability.
- Mold and Mildew Prevention: Moisture can create an ideal environment for mold and mildew growth, which can cause health issues and damage building materials. Exterior waterproofing reduces the risk of mold and mildew by keeping water out.
- Enhancing Property Value: A well-maintained, waterproofed exterior can increase your property’s market value. Potential buyers are likely to pay more for a home or building that doesn’t have water damage issues.
- Energy Efficiency: Waterproofing can also improve your property’s energy efficiency. Proper insulation and waterproofing can help maintain indoor temperatures, reducing the load on heating and cooling systems.
The Role of Interior Waterproofing

Annual inspections are needed to maintain waterproofing efforts all of our waterproofing installations come with regular maintenance and inspections Interior waterproofing is equally important and serves as an additional line of defense against water intrusion. Here’s why you might need interior waterproofing:
- Basement Protection: Basements are particularly susceptible to water infiltration. Interior waterproofing helps keep basements dry, preventing damage to personal belongings and reducing the risk of mold growth.
- Mitigating Existing Water Problems: If your property already has water issues, interior waterproofing can help manage and reduce the impact. This approach includes installing sump pumps, interior drainage systems, and waterproof coatings.
- Health and Safety: A dry interior environment is crucial for maintaining good indoor air quality. Waterproofing helps prevent mold and mildew, which can cause respiratory problems and other health issues.
- Longevity of Building Materials: Water damage can cause significant wear and tear on building materials. Interior waterproofing protects walls, floors, and other structures from moisture, prolonging their lifespan.
Choosing the Right Waterproofing Solution
Determining whether you need exterior or interior waterproofing—or both—depends on your specific situation. Here are some factors to consider:
- Climate and Weather Conditions: Properties in areas with high rainfall or prone to flooding may benefit more from exterior waterproofing.
- Age and Condition of the Property: Older properties with existing water damage may require comprehensive interior waterproofing solutions.
- Budget and Resources: While exterior waterproofing is typically more expensive, it offers long-term benefits. Interior waterproofing can be a cost-effective solution for managing current issues.
Professional Waterproofing Services
IICRC Water-Mold-Smoke-Fire Damage Certified Professionals Call ☎️ 859-267-3482 At Property Damage Solutions, we specialize in both exterior and interior waterproofing services. Our team of experts can assess your property, identify potential water intrusion points, and recommend the best solutions to protect your investment.
Conclusion
Waterproofing is not just an optional upgrade; it’s a necessary step to protect your property from the damaging effects of water. Whether you need to safeguard the exterior, manage existing interior issues, or both, professional waterproofing services can help you maintain a safe, dry, and valuable property. Contact us today to learn more about our comprehensive waterproofing solutions and how we can help you achieve peace of mind and long-term property protection.
For more information, visit Property Damage Solutions or give us a call at 859-302-9666. Let us help you keep your property safe from water damage.
-
Understanding Whiskey Fungus: Causes, Effects, and Prevention

Whiskey Fungus Is A Black Mold Whiskey fungus, also known as Baudoinia compniacensis, is a type of black mold that commonly grows on buildings and structures near whiskey distilleries and other facilities where ethanol is produced. While whiskey fungus itself does not pose significant health risks to humans, it can cause aesthetic and structural damage to buildings and outdoor surfaces. In this article, we’ll explore the causes, effects, and prevention measures for whiskey fungus.
Causes of Whiskey Fungus:
Whiskey fungus thrives in environments with high levels of ethanol vapor, which are typically found near distilleries, breweries, and other industrial facilities where alcohol is produced. The fungus feeds on the ethanol vapors released during the fermentation and aging processes, as well as on other organic compounds present in the air.

Houses Near Distilleries Commonly Need Pressure Washed And Treated Effects of Whiskey Fungus:
- Aesthetic Damage: The most noticeable effect of whiskey fungus is the black staining it creates on outdoor surfaces such as buildings, fences, and trees. These unsightly stains can detract from the appearance of properties and structures, leading to concerns among property owners and communities.
- Structural Damage: In addition to aesthetic concerns, whiskey fungus can also cause structural damage to buildings and other surfaces over time. The fungus can penetrate and degrade certain types of building materials, including wood, concrete, and metal, potentially compromising their integrity and longevity.
- Environmental Impact: Whiskey fungus releases spores into the air, which can spread and settle on nearby vegetation, soil, and water bodies. While the impact of whiskey fungus on the environment is relatively minimal compared to other types of pollution, it can still contribute to ecological changes in affected areas.

We use a plant based anti microbial in our monthly treatments for clients as well as thorough inspections to the most vulnerable areas of the home. These monthly treatments are for any microbes as well as whiskey fungus. Prevention of Whiskey Fungus:
- Site Selection: When planning the location of a distillery or industrial facility, consider the surrounding environment and potential impacts on nearby properties. Choose sites with adequate distance from residential areas and sensitive ecosystems to minimize the risk of whiskey fungus growth.
- Emissions Control: Implement measures to control and reduce emissions of ethanol vapors and other organic compounds from production processes. This may include installing vapor recovery systems, improving ventilation, and optimizing fermentation and aging techniques to minimize emissions.
- Surface Treatments: Apply protective coatings or sealants to outdoor surfaces to create a barrier against whiskey fungus growth. These treatments can help prevent the fungus from establishing a foothold and make it easier to clean and remove any staining that does occur.
- Regular Maintenance: Implement a regular maintenance schedule to inspect and clean outdoor surfaces for signs of whiskey fungus growth. Promptly remove any black stains using appropriate cleaning methods and products to prevent further spread and damage.
- Community Engagement: Foster open communication and collaboration with local communities and stakeholders to address concerns related to whiskey fungus. Educate residents and property owners about the causes and effects of the fungus and involve them in discussions about prevention and mitigation strategies.
Conclusion:
Whiskey fungus may not pose a direct health risk to humans, but its presence can have significant aesthetic and structural impacts on buildings and outdoor surfaces near distilleries and industrial facilities. By understanding the causes of whiskey fungus and implementing proactive prevention measures, we can minimize its effects and preserve the integrity and beauty of our communities.
For professional assistance with whiskey fungus removal and prevention, contact Property Damage Solutions at (859) 302-9666 or email propertydamage123@gmail.com.
We Are IICRC Certified Mold Removal Specialists Call, Text, Email, we do emergency water extraction 24/7/365
-

Emergency Water Extraction from Basements and Crawlspaces in Richmond, Kentucky
Emergency Water Extraction from Basements and Crawlspaces in Richmond, Kentucky
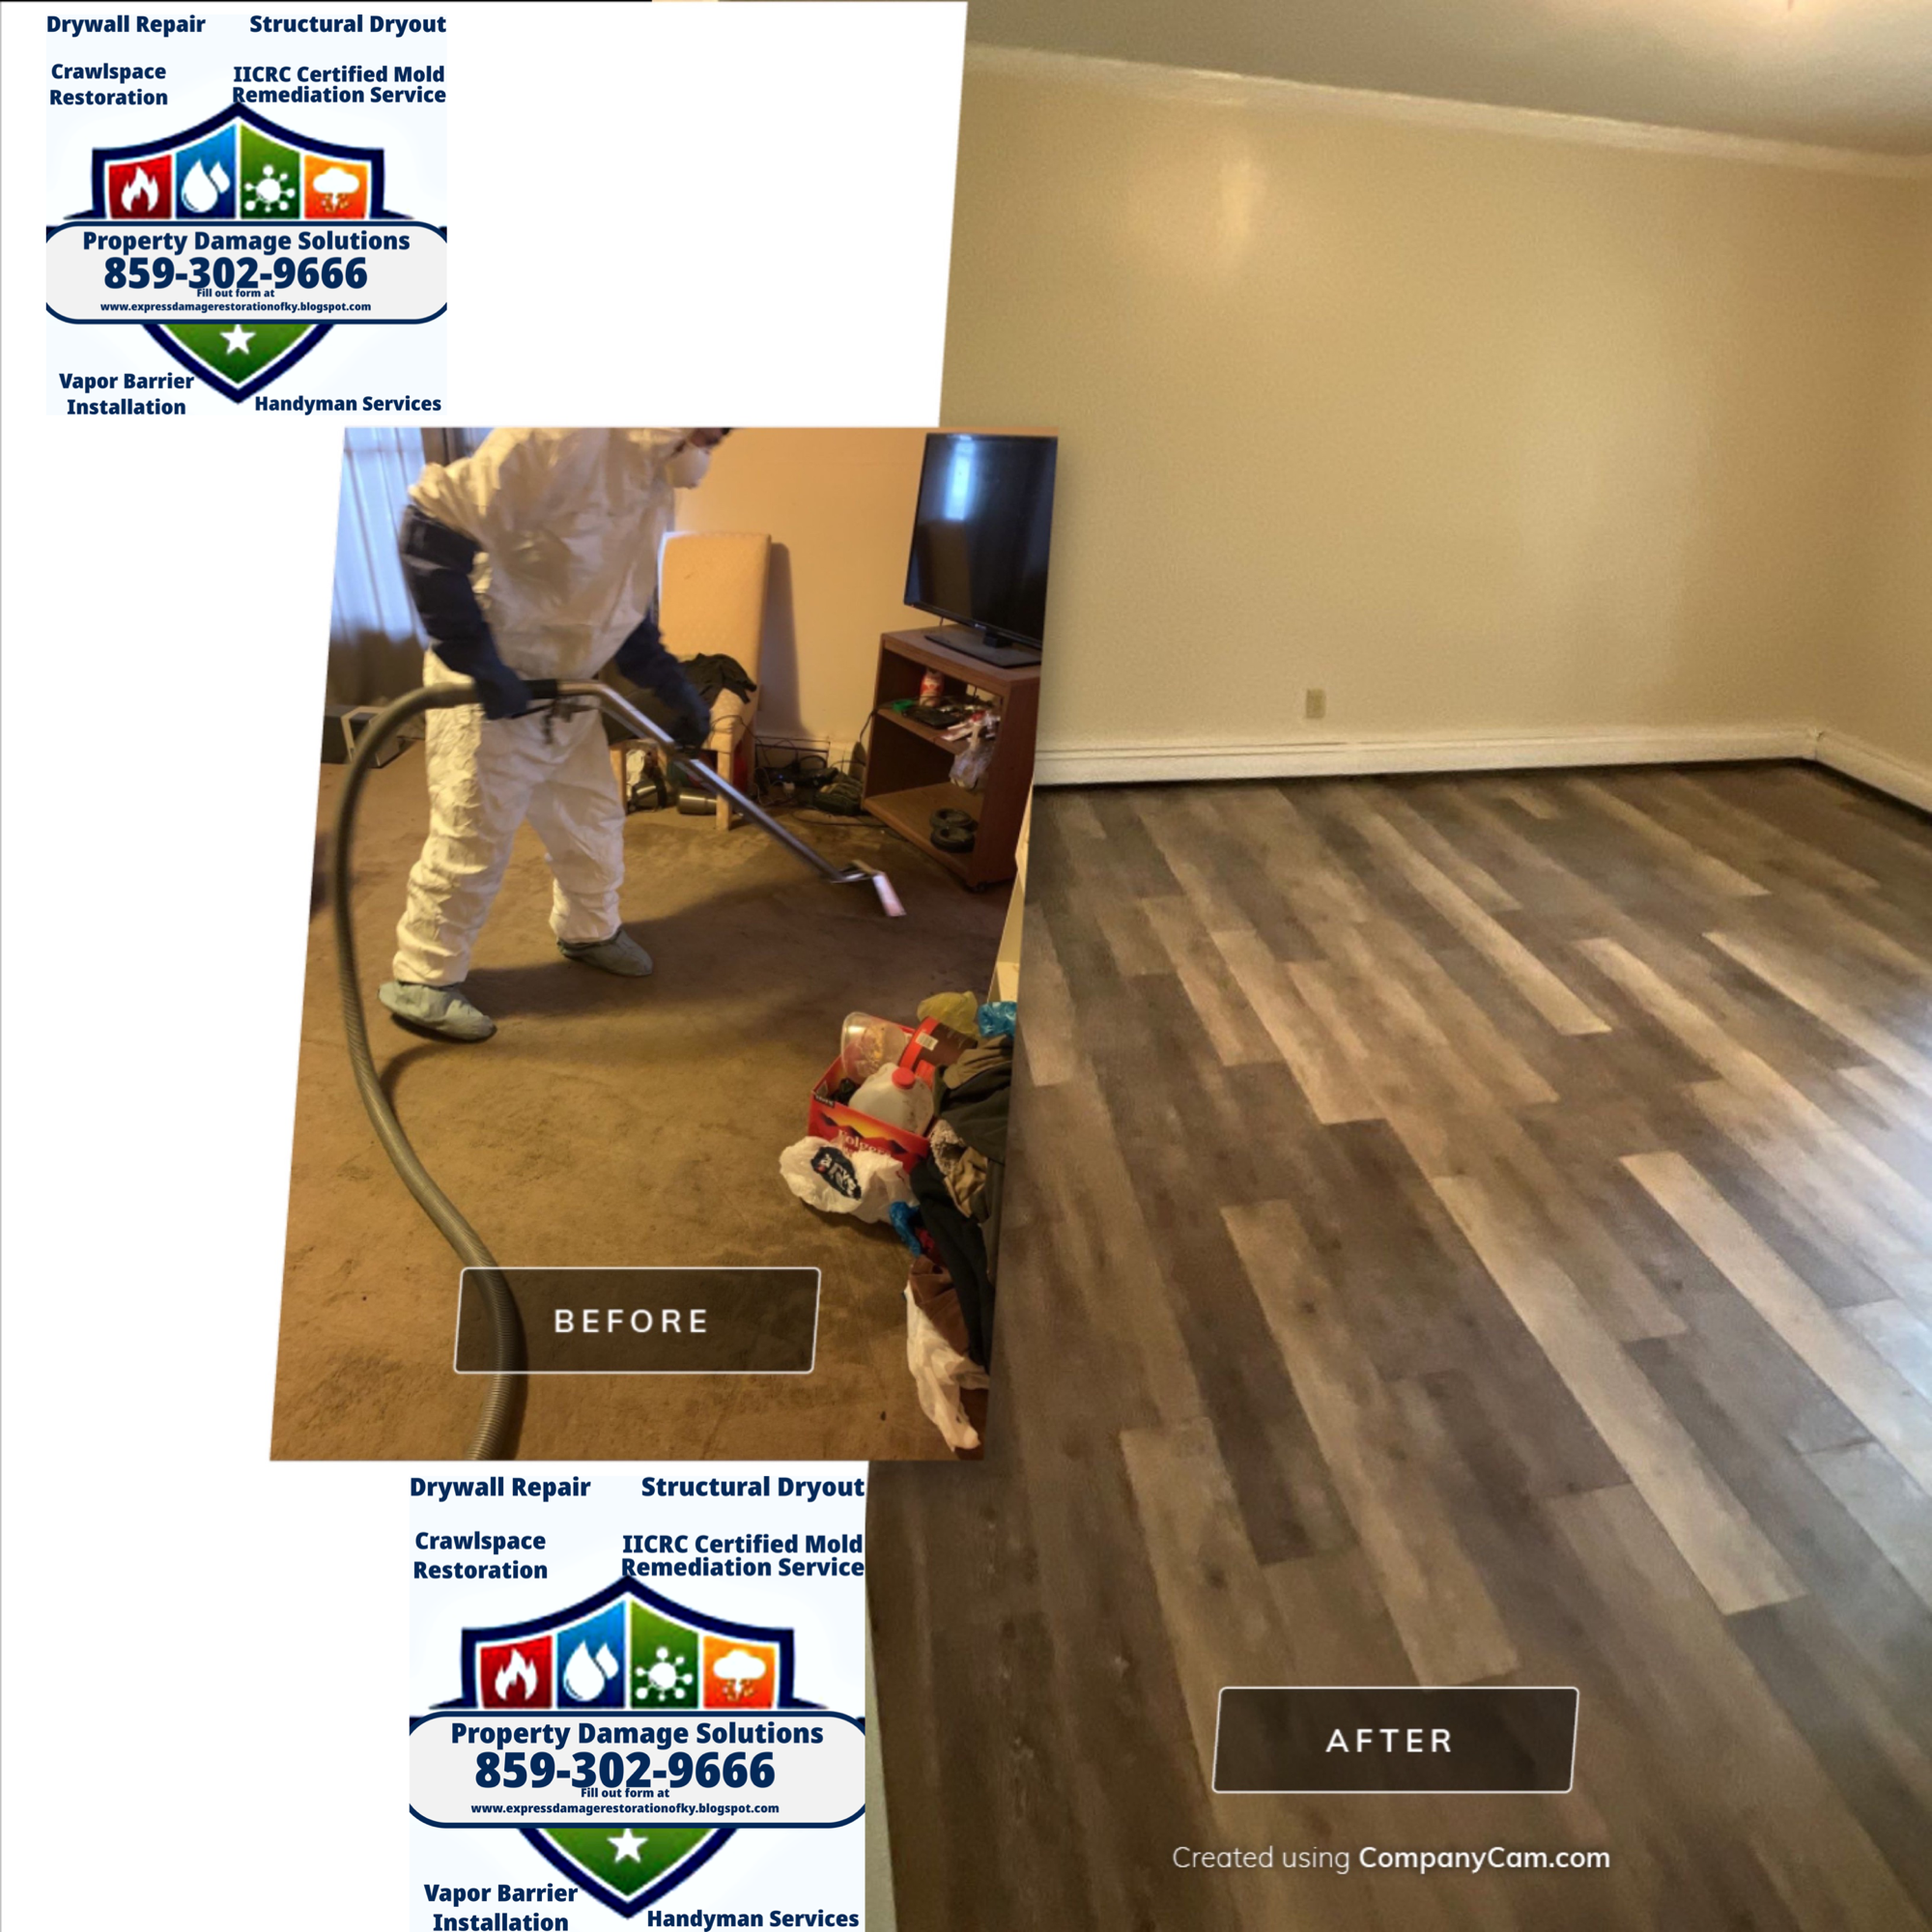
When disaster strikes, swift action is crucial to minimize damage and restore normalcy. At Property Damage Solutions, we specialize in emergency water extraction services for basements and crawlspaces in Richmond, Kentucky, and surrounding areas of central Kentucky. With our prompt response and expertise, we’ll help you mitigate water damage effectively, ensuring your property is restored to its pre-loss condition.
Expert Water Extraction Services
Our team of skilled professionals is equipped with state-of-the-art equipment and industry-leading techniques to tackle water emergencies of any scale. Whether it’s a burst pipe, flooding, or any other water-related catastrophe, we’re here to provide swift and efficient water extraction services.
Comprehensive Assessment and Planning
Upon arrival at your property, our certified technicians will conduct a thorough assessment of the water damage. We’ll determine the extent of the damage and formulate a tailored plan to address the situation effectively. Our goal is to minimize disruption to your life and property while ensuring thorough water extraction and drying.
Advanced Equipment and Techniques
At Property Damage Solutions, we utilize advanced water extraction equipment, including powerful pumps, extractors, and dehumidifiers, to remove water quickly and efficiently. Our team is trained in the latest techniques for water removal and structural drying, ensuring that your property is dried thoroughly to prevent mold growth and structural damage.
24/7 Emergency Response
Water emergencies can happen at any time, day or night. That’s why we offer 24/7 emergency response services to our clients in Richmond, Kentucky, and the surrounding areas. You can count on us to be there when you need us the most, ready to provide immediate assistance and peace of mind.
Licensed, Bonded, and Insured
Property Damage Solutions is a licensed, bonded, and insured water damage restoration company. We adhere to the highest industry standards and regulations to ensure the safety and satisfaction of our clients. With us, you can rest assured that your property is in capable hands.
Contact Us Today
 Call ☎️ 859-302-9666
Don’t let water damage wreak havoc on your property. If you’re facing a water emergency in your basement or crawlspace, don’t hesitate to contact Property Damage Solutions at 859-302-9666. Our team is standing by to provide prompt, professional assistance and help you restore your property to its former glory.
-
How Does A.T.P testing work

The following article explains; How Does A.T.P testing work.
ATP (Adenosine Triphosphate) testing is a method used to determine the presence of biological contamination, such as bacteria, yeast, or mold, in a sample. The test works by measuring the amount of ATP (a molecule found in all living cells) in a sample using a luminometer.

A.T.P Testing With A Luminometer Typically, the sample is mixed with a reagent called luciferin, which reacts with ATP to produce light. The amount of light produced is proportional to the amount of ATP present in the sample. The light emission is then measured by the luminometer, and the result is reported in relative light units (RLU). High RLU values indicate high levels of ATP and therefore high levels of biological contamination.
ATP testing is widely used in a variety of industries, including food safety, environmental monitoring, and healthcare, as a quick and simple way to assess the level of hygiene and cleanliness in a given area.
-
lexington, kentucky, mold damage, mold inspection company, mold remediation, mold removal, richmond,Kentucky, Water Damage, water damage cleanup, water damage cleanup company, water damage mitigation, water damage mitigation company, water damage restoration, water removal service near me, water restoration company
How to thaw frozen pipes

For emergency water removal call ☎️ (859)302-2702
Old man winter is unbearable as it is, water damage from burst frozen pipes in the middle of it can be a nightmare. Should your pipes freeze, the following will give you tips on how to thaw frozen pipes.

Tips on thawing frozen water pipes to parent water damage Thawing Frozen Pipes
What to do if a pipe bursts
https://www.lex18.com/news/unprecedented-number-of-water-pipes-break-in-lexington?_amp=true
If a pipe bursts in your home, you’ll need to act fast to mitigate additional damage. Shut off your water as quickly as possible. This will help minimize the amount of water that seeps out inside your walls. You may also want to shut off power in the affected area of your home. After you’ve taken these precautionary steps, it’s time to call a plumber and start mopping up any mess that’s been caused. Try to remove as much of the water and lingering moisture as you can to avoid mold and mildew buildup. Depending on the severity of your case, you may also need to bring in other professionals to address damage to your walls, carpet, flooring or ceiling.
Shit water off to prevent water damage in case a pipe bursts How to thaw out pipes
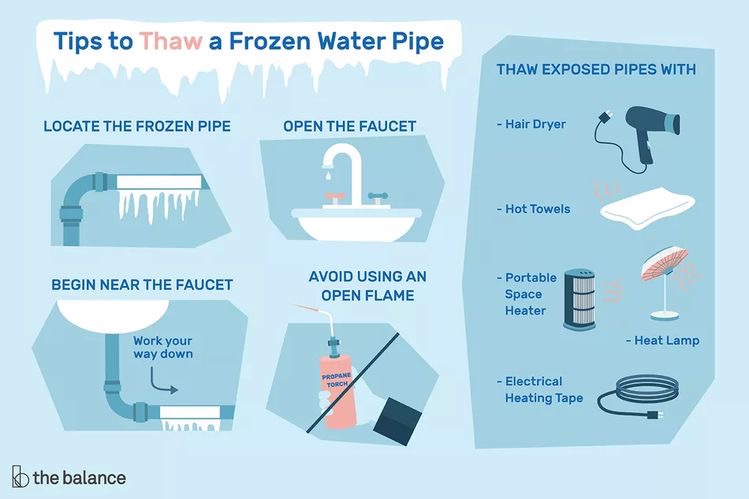
How can you tell if your pipes are frozen? If you turn on the bathroom or kitchen faucet and see only a few drops or a trickle of water, this could indicate that water inside the pipes has frozen – preventing a free flow. But don’t panic. You may be more equipped to deal with the situation than you think. Here’s a quick lesson on how to thaw a frozen pipe.
Step 1. Turn on the faucet
Keep it running. Allowing the faucet to drip even slightly can help prevent a pipe from bursting. It’s simple – when freezing takes place, extreme pressure builds between the faucet and the ice blockage. An open faucet relieves this pressure buildup, in turn preventing a burst from occurring.
Step 2. Apply heat to the frozen area, thermal energy promotes drying.
Slowly apply heat using a hair dryer. There are several ways to do this. You can wrap the pipes in thermostatically controlled heat tape, or you can use an external heat source such as a hair dryer or space heater. Do not use a propane torch as this can damage the pipe and present a fire risk.
If you decide to use a hair dryer, begin directing air close to the faucet end of the pipe and gradually move toward the coldest section. Be careful not to overheat the hair dryer or blow a fuse. Remember, the faucet should be left on while heat is being applied.
Step 3. Continue to apply heat
Don’t stop heating until full water pressure is restored. Even then, it’s a good idea to leave the faucet open for a few minutes after the pipe is thawed. This will give the ice time to completely clear from the line.
Ways to thaw frozen pipes Step 4. Check all faucets and prevent pipes from freezing in the future
Check each faucet in your home for any other frozen pipes. One frozen pipe may mean that others have been affected as well.
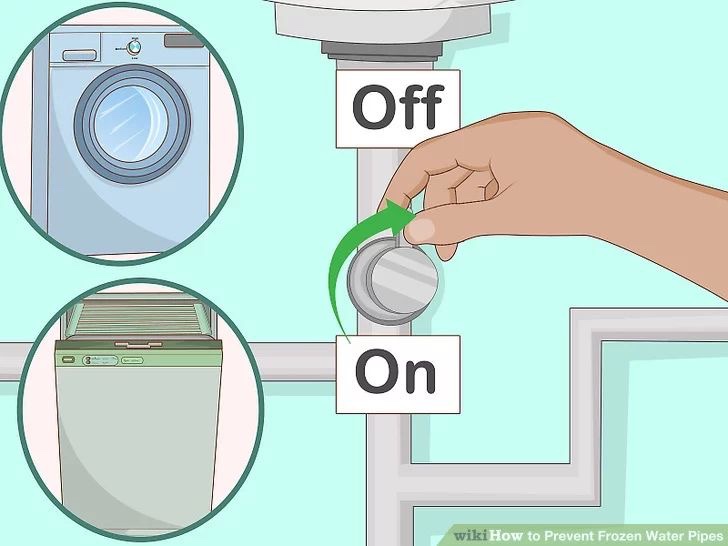
If the problem persists, contact a plumber. You can prevent pipes from freezing again by taking a few simple steps:
Before traveling, keep the temperature in your home above freezing and turn off all the water to your house.
Be sure to keep all water pipes, especially those close to outside walls, insulated with foam rubber or heating cable.
Keep cabinet doors open to allow air to circulate.
Let your faucets drip cold water – it is harder for a pipe to freeze even if there is a trickle of water flowing through. In order to not waste water, you can collect the drops and reuse it, possibly for cleaning or watering plants.
How long does it take for pipes to unfreeze?
Using any of the handful of methods on how to thaw frozen pipes will typically take about 30 minutes. This can vary depending on the weather, how long the pipe has been frozen and where the pipe is located. Any of these factors can cause the thawing process to take longer.2
And remember, a frozen pipe isn’t the only issue that comes with cold weather. Find out other ways to protect your home during the winter.
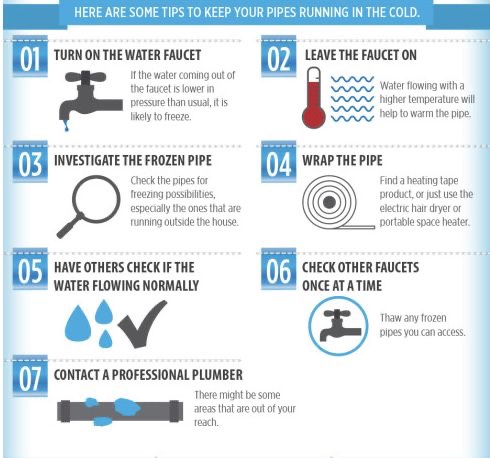
Ways to prevent frozen pipes Quick tip on drying if you have a pipe burst, find out the GPP (grains per pound) inside your home and then outside, you can do this by purchasing a thermometer hydrometer. If the gpp is lower outside than inside, then you can dry your home with what is known in the water damage restoration industry as “an open drying system. Click to check out our mold damage prevention tips there is more tips on how to dry a house out after water damage without water damage restoration equipment.
-
Storm damage cleanup, Call (502)503-1902
Contact Express Damage Restoration Of KY in Central Kentucky, Today
Dealing With Water Damage?
EMERGENCY WATER DAMAGE CLEANUP CALL (859)302-2702
The longer water sits, the more damage it causes. If you have water damage in your home or business, don’t hesitate to call Express Damage Restoration Of KY. We’ll be at your side in no time, and we’ll restore your home or business to normal. We serve Madison County, Kentucky; Fayette County, Kentucky; and Jessamine County, Kentucky.
In addition to immediate damage sustained by drywall, carpeting, fabrics and other finish materials, water begins ravaging a home within the first 24 to 48 hours after flooding. Mold, rot and corrosion begin to set in within that time, leading to problems that linger long after the water is gone. That’s why a quick pump-out is critical.
The best tool for this job is a sump pump. While heavy-duty models may use special high-capacity hoses, most self-contained pumps hook up to any garden hose. In most cases, a “floor sucker” pump is best, because it removes water down to about 1/8 inch from the floor. Hook a hose up to the pump, and run it out of the house so the water flows out well away from the foundation. Move the pump as needed to extract as much water as possible.
A note about electrical safety: Working in standing water is a very common cause of electrocution (that means permanent lights out). Don’t take any chances. Shut off the power to any electrical circuits or devices in the area, including the furnace if it’s touching water. Plug the pump or any other tools or appliances into a GFCI-protected outlet (you should have them in the kitchen, bathroom and garage) or use a GFCI-protected extension cord.
Water damage is one of the most challenging issues that a property owner can face because of different factors. First, they can cause severe damage to one’s establishment and belongings when left unresolved. Second, it can cause the growth of that can severely affect your property’s indoor air quality and can even be detrimental to you and your tenants’ health. Finally, it significantly brings the value of your property down that can be a problem if you’re planning to resell it soon. But don’t worry, it’s not something that can’t be resolved. If you’ve found yourself asking “Can you fix water damage on wood?” after discovering a severe case developing in your property, then you’re in the right place. In this article, we are going to talk all about water damage, focusing on how to deal with water damaged wood and more. Let’s get started.
WHAT IS WATER DAMAGE?
In a nutshell, it is the type of damage done on a structure and the belongings within due to excessive moisture and collected water. This usually happens in least-visited spaces of the establishment where water can collect without notice. They are also usually the lowest depths of one’s property like crawl spaces and .
https://www.expressdamagerestorationofky.com
IS WOOD RUINED IF IT GETS WET?
Now, wood is usually treated to withstand the elements, especially if it’s going to be used in construction, however, since it is still a natural material, it can still when exposed to moisture for an extended period of time.
WHAT DOES WATER DAMAGED WOOD LOOK LIKE?
Surprisingly, though, water damage and may seem very similar at first. However, there are tell-tale signs that differentiate them from each other. For instance, water damaged wood break down into cube-sized chunks while termite damaged wood develops tunnels due to termites munching on the softer grain first.
THE EFFECTS OF WATER DAMAGE ON DIFFERENT TYPES OF WOOD
Expanding on that, various types of wood react differently to water damage. For instance, hardwood floor water damage looks different from plywood and particleboard. Due to the limited space in this guide, we’ll only be talking about these three most common types of wood.
HARDWOOD
Water damage on the will show through staining and discoloration. Aside from that, it will also lift floorboards and the nails that are holding them down. You can pretty much say goodbye to your pretty flooring.
PARTICLEBOARD
Another common type of wood that you might have in your establishment is. It is usually treated with a water-resistant veneer surface and is usually used as the primary material for desks and cabinets. Excessive moisture can cause your particleboard to sag, though, and weaken, causing almost permanent damage.
PLYWOOD
Finally, there’s that is usually used for walls and furniture. What some of us don’t realize, though, is that plywood is made up of different layers of wood glued together. Hence, excessive moisture can cause these layers to warp and eventually fall apart.
HOW TO FIX WATER DAMAGED WOOD?
Regardless of what type of wood you have in your commercial property, though, one thing is clear. It can be damaged by water. Hence, why don’t we move on to the next part of our guide and talk about how to repair water damaged wood.
PREPARING FOR RESTORATION
The first thing that you should do is to prepare for the repair process. Do you require certain tools and materials (like auto filler putty)? Do you have the proper protective equipment? Remember, inhaling airborne contaminants caused by mold growth as a result of water damage can get you sick. Do you have the proper skill set to do the repairs yourself? Because if not, then you can always hire a commercial water damage restoration company to you out. Finally, you should remember to seal off the area that you are going to be working in to avoid cross-contaminating other areas in your commercial space.
REPAIRING WATER DAMAGE: THE EASY WAY
Once you have prepared everything you need, then you can start the repair process. The first step is to remove any rotting wood that can’t be salvaged anymore. Once you have carved out the damaged areas, you can use auto filler putty to fill them in. Just make sure that you are able to push the putty in to completely fill the hole that you have carved out. Allow the filler to dry and sand for a smoother finish. And that’s it! All that’s left for you to do now is to prime and paint the wooden surface and it will look as good as new. In fact, why not repaint the whole area to better blend your repair job to its immediate surroundings?
However, the method that we have mentioned above is a quick fix. It must be regularly checked and maintained later on to make sure that no other damage has been done. This is also not advisable for wood that plays an integral part in your property’s structure. This type of damaged should be left to the pros to handle to prevent causing more damage to the integrity of your architecture.PREVENTING MOLD GROWTH
Speaking of maintenance, a huge chunk of that should be dedicated to preventing mold growth. Hence, here are some tips on how to do just that:
- There are different cleaning products that can efficiently deal with different types of mold. Make sure that you are also able to spot the main culprit behind the water damage in the first place. Is it a leaky pipe? Is there a hole somewhere that lets the rain in? Deal with it immediately.
- The way to handle mold removal is to prevent mold growth in the first place. Hence, make sure to dry the area completely. Install dehumidifiers as well, in order to control the moisture within that room.
- Remove any items or furniture that are still wet to dry outside. Discard any items that are too damaged to save properly to prevent cross-contamination. This will also prevent them from affecting the indoor air quality of your establishment.
- Finally, while you’re outside, go ahead and check if there’s water collecting in the ground. They can easily seep into the interiors of your property and cause more damage.
REPLACE DAMAGED WOOD
There are different ways on how to remove moisture from the wood. In fact, if you’re wondering about how to get water stains out of wood, then you’ll be pleased to learn that you can even remove them by using an iron, or by spreading mayonnaise on the problem area! Yes, you’ve read that right. Mayo. However, if you think that the damage is simply too severe, then there’s nothing else to do than to replace the damaged wood, especially if you’re going to be sacrificing your tenants’ safety if you push through with “salvaging” it. It’s simply not worth it.
HOW TO FIX WATER DAMAGED SWOLLEN WOOD FURNITURE
Do you have a wood table that has become swollen due to excessive moisture? Do you have other water damaged furniture? Then let it completely dry first. Proceed on cleaning the mold out that piece with bleach or your preferred mold-cleaning solution. Once you’re done cleaning, cut away and replace severely damaged parts if necessary. If not, then you can move on to sand the piece to restore it to its originally smooth surface. Finally, it would be up to you to decide how you’re going to finish your repair work. Are you going to cure the wood? Add a new finish? Repaint it? It’s up to you.
HOW TO FIX A WATER DAMAGED WOODEN FLOOR
The method that you are going to take on how to minimize water damage to the wood floor will greatly depend on a number of different factors. What type of wood has been used on your flooring? How long did it take for you to notice the damage? How severe is it? You see, it is sometimes cheaper to get the damaged flooring replaced instead of trying to save it. And since it is a crucial part of your property, we sincerely recommend having it checked by a professional mold remediation team instead. Having the pros take over is still the way to deal with wood floor water damage.
WATER DAMAGE RESTORATION RESTORATION EQUIPMENT FOR DRYING WATER DAMAGED WOOD
We do understand why you’d want to handle most of the restorations yourself, though. After all, you own the property in question. Hence, if you really want to deal with the issue yourself, then there is some water damage restoration equipment that we believe will greatly benefit you:
AIR MOVERS
As the name suggests, it is an equipment used to move air, but in its process, it actually s dry water-damaged flooring and surfaces by forcing moisture to evaporate more quickly.
DEHUMIDIFIERS
Another piece of equipment that can in water damage restoration is the dehumidifier since it is specifically designed to deal with excessive moisture. Aside from that, it can also maintain the humidity of an area to a set level.
AIR SCRUBBERS
You would probably have to deal with airborne contaminants as well, especially if you can smell the musk of mold in the air. You will need an air scrubber for that which filters out any particles in your indoor air.
RESTORATION MOISTURE METERS
Finally, you will need a restoration moisture meter. It is a device that gauges the severity of water damage on a surface or an area by assessing the moisture present. It is a must for you to have if you’re planning to do all the restoration on your own.
CONCLUSION
And that’s it! We hope that you have found our guide in your current predicament. Don’t worry, by keeping the tips we have shared with you above in mind, we’re sure that your commercial property will be able to pull through water damage in no time. Good luck!
The entire world is currently battling a global pandemic, and while it is mostly down to the individual to protect himself by practicing social distancing and following quarantine procedures, we, as employers have a bigger responsibility in ensuring that our workspace remains safe amidst the crisis. Hence, in this article, we are going to share with you ways of preventing illness in the workplace, how to prevent infectious diseases, as well as other tips on proper infectious disease control.
WHAT IS INFECTIOUS DISEASE CONTROL?
Before we move on further in the article, it’s important to get a good grasp of the subject of discussion first. What is infectious disease control, anyway? According to the W.H.O , infection prevention and control, also known as IPC, is a method of cleaning and minimizing the spread of contagious disease.
Two troubling examples of infectious diseases are influenza (that has caused the death of millions in the 1900s) and the novel coronavirus that’s ravaging the world right now.
You might be wondering, though, how is infection spread? In fact, there are different ways of how this can happen. That depends on the germs that are causing the infection. However, a very common way for a contagious disease to spread, especially one that’s caused by a virus, is by cross-contamination through expelled bodily fluids such as the respiratory droplets we release when we cough or sneeze.
WHY IS INFECTION CONTROL SO IMPORTANT IN THE WORKPLACE?
You can see now how fast an infection can spread especially in crowded places like a busy office space. This is the reason why infection control is critical. It will keep your workspace a safe and healthy place to work in.
Aside from that, it can also cost you a lot in terms of lower productivity levels and job satisfaction of your employees. Just imagine what an all-out infection can do to your employees and how it can damage your ROI if everyone got sick?
INFECTION PREVENTION AND CONTROL
Fortunately for us, there are various infection control measures that can get rid of the lurking germs in the workplace. Allow us to share with you our tips, neatly divided into three categories.
INFECTION CONTROL PLAN
With an infection already happening outside, here are some workplace infection control procedures:
- Plan Accordingly. The first thing that you should do is to come up with an infection control plan. Involve your management team since they’ll be the ones working more closely with your employees and enforce your established workplace policies and procedures for infection control.
- Remove Common-Use Items. In relation to the previous tip, an infection can also spread by touching items that have been contaminated by other people. Hence, remove common-use items such as magazines and pens from your common rooms.
- Encourage Basic Etiquette. Another way of preventing the spread of infection is to encourage your employees to practice the basic etiquette of covering their mouths when they cough or sneeze by providing boxes of tissues and disinfectant wipes especially in common rooms where they interact with more people. At the same time, discourage them from sharing personal items like cups, glasses, and cutleries where they can easily transfer their respiratory droplets to other people.
- Basic Sanitation. The way to prevent the spread of infection is to provide ways for your employees to rid themselves of germs by putting up clean handwashing facilities and sanitation stations equipped with alcohol or alcohol-based hand sanitizers.
- Basic Health Checks. Everyone must have their temperature checked before entering your facility. Anyone who is not feeling well, or doesn’t look well should be immediately sent home or to a health care facility depending on his state. Plus points if you can provide your employees with vitamin supplements as well in order to strengthen their immune system.
- Work Remotely. But, in the end, the most effective way to control the spread of infectious disease is to still let them all go home and simply let them work from there. If you really must require the attendance of a skeletal workforce to continue operations, then at least provide them with a mode of transportation instead of forcing them to take public transit where they’ll be exposed to other people that might be infected already.
FACILITY CLEANING AND DISINFECTION
Now that your employees are working from home, this gives you the opportunity to clean your work facility and disinfect it so that it’s clean and ready to receive your employees once regular operations resume. There are two ways to go about this:
- Handle it yourself. First, you can let your existing maintenance staff perform the virus cleaning given that you’ll provide them with the necessary personal protective equipment and tools. You should focus on cleaning surfaces that have been the most exposed to contamination such as doorknobs, stair railings, elevator buttons, and the like.
- Seek professional . Or second, you can seek the of professional cleaning services equipped with handling infectious disease control instead. This is honestly what we recommend, especially for workplaces like hospitals and health care facilities that are significantly more exposed to diseases, contagious or not.
EFFECTIVE VENTILATION SYSTEM AND AIR QUALITY
Finally, remember that some germs are airborne and they can survive being suspended in your facility for an extended time if you have poor indoor air quality and improper ventilation.
This is the perfect time to check if your ventilation systems work properly, as well as install equipment like air movers and air scrubbers to rid your indoor air from contaminants. Better yet, schedule your ventilation checks and indoor air cleaning procedures regularly not just during a pandemic or epidemic, but as part of your regular maintenance routine. In this way, you can prevent other indoor air pollutants from causing your employees other health problems as well.
By keeping the tips we have shared with you in mind, we are confident that you will be able to keep your employees safe from the novel coronavirus and other infectious diseases that we may encounter in the future. Stay healthy and
Water Damage Restoration
Complete Water Damage Restoration in Central Kentucky
As Good as New
Water can wreak havoc on your property by destroying flooring and furniture, creating electrical hazards, and causing structural damage. Luckily our team is here to return your home to normal. We work quickly to make your home or business look and function exactly as it did before the water damage.
Efficient Restoration
If your home or business has any water damage, you need a fast solution. While damaged floors may seem like a simple inconvenience, mold could endanger anyone on your property. Our team is available all day, every day, so you can call us for a fast and effective restoration, no matter the time or damage.
Certified Specialists
At Express Damage Restoration Of KY, we believe in offering the best service possible every time. To make that happen, we extensively train each and every employee. We are a team of specialists who have been certified and licensed to deal with water damage. This means you can trust our team.
Water damage restoration is performed after the damage has already occurred and is usually an emergency service. During the restoration, specialists repair or replace materials that were destroyed, and return the home to its former state. When to Call a Professional for Water Damage Repair
The Water Restoration Process
After a water damage event such as water heater or flood damage, a fast response in starting the restoration is critical.
Water restoration is a five-step process that starts with an inspection and ends with your home completely restored to its previous state. Every step of the process serves an important purpose, ensuring that all water and contaminants are properly removed.
Water Damage Restoration Steps
- Inspection and Assessment
- Water Removal
- Drying and Dehumidifying
- Cleaning and Sanitizing
- Restoration and Repair
Every step of the process serves an important purpose, ensuring that all water and contaminants are properly removed.
Water Restoration Steps in Detail
Step 1 : Inspection and Assessment
Restoration companies perform a thorough damage assessment of the location of the damage. During this inspection, a water restoration specialist will make assessments to categorize and classify the damage that has occurred.
Water restoration experts will check the materials’ porosity in the impacted area to determine how much water absorption has occurred. Moisture detectors, including hygrometers and moisture scourers, will measure the level of damage and estimate the amount of work required. Based on the findings, they will rate the damage from Class 1 to 4.
Water damage inspectors will also identify the water source to ensure the water has stopped and determine the contamination level of the water. The water will then be rated Category 1, 2 or 3.
After an inspection has occurred, the water restoration company will tell you the approximate time and costs required to restore your home, as well as payment options.
Step 2 : Water Removal
The next step in the restoration process is to remove standing water via water extraction. Standing water can deteriorate and continue to damage your home, so all it must be removed as quickly as possible. Water extraction is especially important when dealing with a flooded basement as standing water in the basement leads to severe mold growth.
Water restoration companies use extractors to remove water during the extraction process. These high-powered pumps and vacuums are designed to absorb all standing and surface water from your home quickly.
Several different types of extractors may be used to remove water, including:
- Submersible pumps
- Truck-mounted vacuums
- Portable wet/dry vacuums.
Step 3 : Drying and Dehumidifying
After the water is physically extracted from the home, restoration companies begin the dehumidification and drying process. Industrial quality air movers and dehumidifiers are used to dry out any materials that still contain water or were too challenging to access during extraction.
At this stage, your home may look dry, but some materials can be wet to the touch. If left alone, these materials may suffer further damage such as warping, breaking or growing mold. Water restoration companies prevent this by completely drying and dehumidifying the impacted area.
Throughout this stage, water remediation specialists monitor moisture levels in the walls and floors of the affected areas to determine when your home is dry so that professional cleaning can begin.
Step 4 : Cleaning and Sanitizing
Thorough, professional cleaning is a required step in all home restoration projects. At the same time, restoration companies work to preserve as much of your personal property as possible.
Cleaning should always be performed by experts trained in the safety and sanitization requirements of water-damaged homes.
Cleaning may take many forms, including:
- Spray and wipe cleaning
- Dry cleaning
- Wet cleaning
Restoration professionals may also use foam, abrasive or immersion cleaning techniques to ensure every item is cleaned as thoroughly as possible. This step may also involve mold remediation as necessary.
Experts have specialized personal protective equipment (PPE) for cleaning potentially hazardous materials, including N-96 respirators, protective gloves and waterproof clothing.
At this stage, restoration specialists also dispose of any damaged materials that were removed during the cleaning phase.
Step 5 : Complete Restoration
The final step of the restoration process is restoration. During the restoration, specialists return your home to the state it was in before the damage occurred. Any materials that were permanently damaged or removed will now be fixed or replaced. Restoration projects may be simple or extensive, depending on the amount of permanent damage that occurred. . In others, restoration work is extensive and will require complete reconstruction on parts of your home.
-
What is mold remediation?
What is mold remediation and how does it work?
Mold remediation is the process of identifying and removing unhealthy levels of mold that have colonized in a home, office, school or other building. This is known as returning to condition 1.
Condition 2 is settle spores from condition 3.
Condition 1 is defined as a normal indoor fungal ecology.
Over time, if untreated, mold can destroy a home by breaking down cellulose-based materials (like wood or ceiling tiles) and causing a slow and messy decay. In the shorter term, a mold colonization can cause severe health problems.
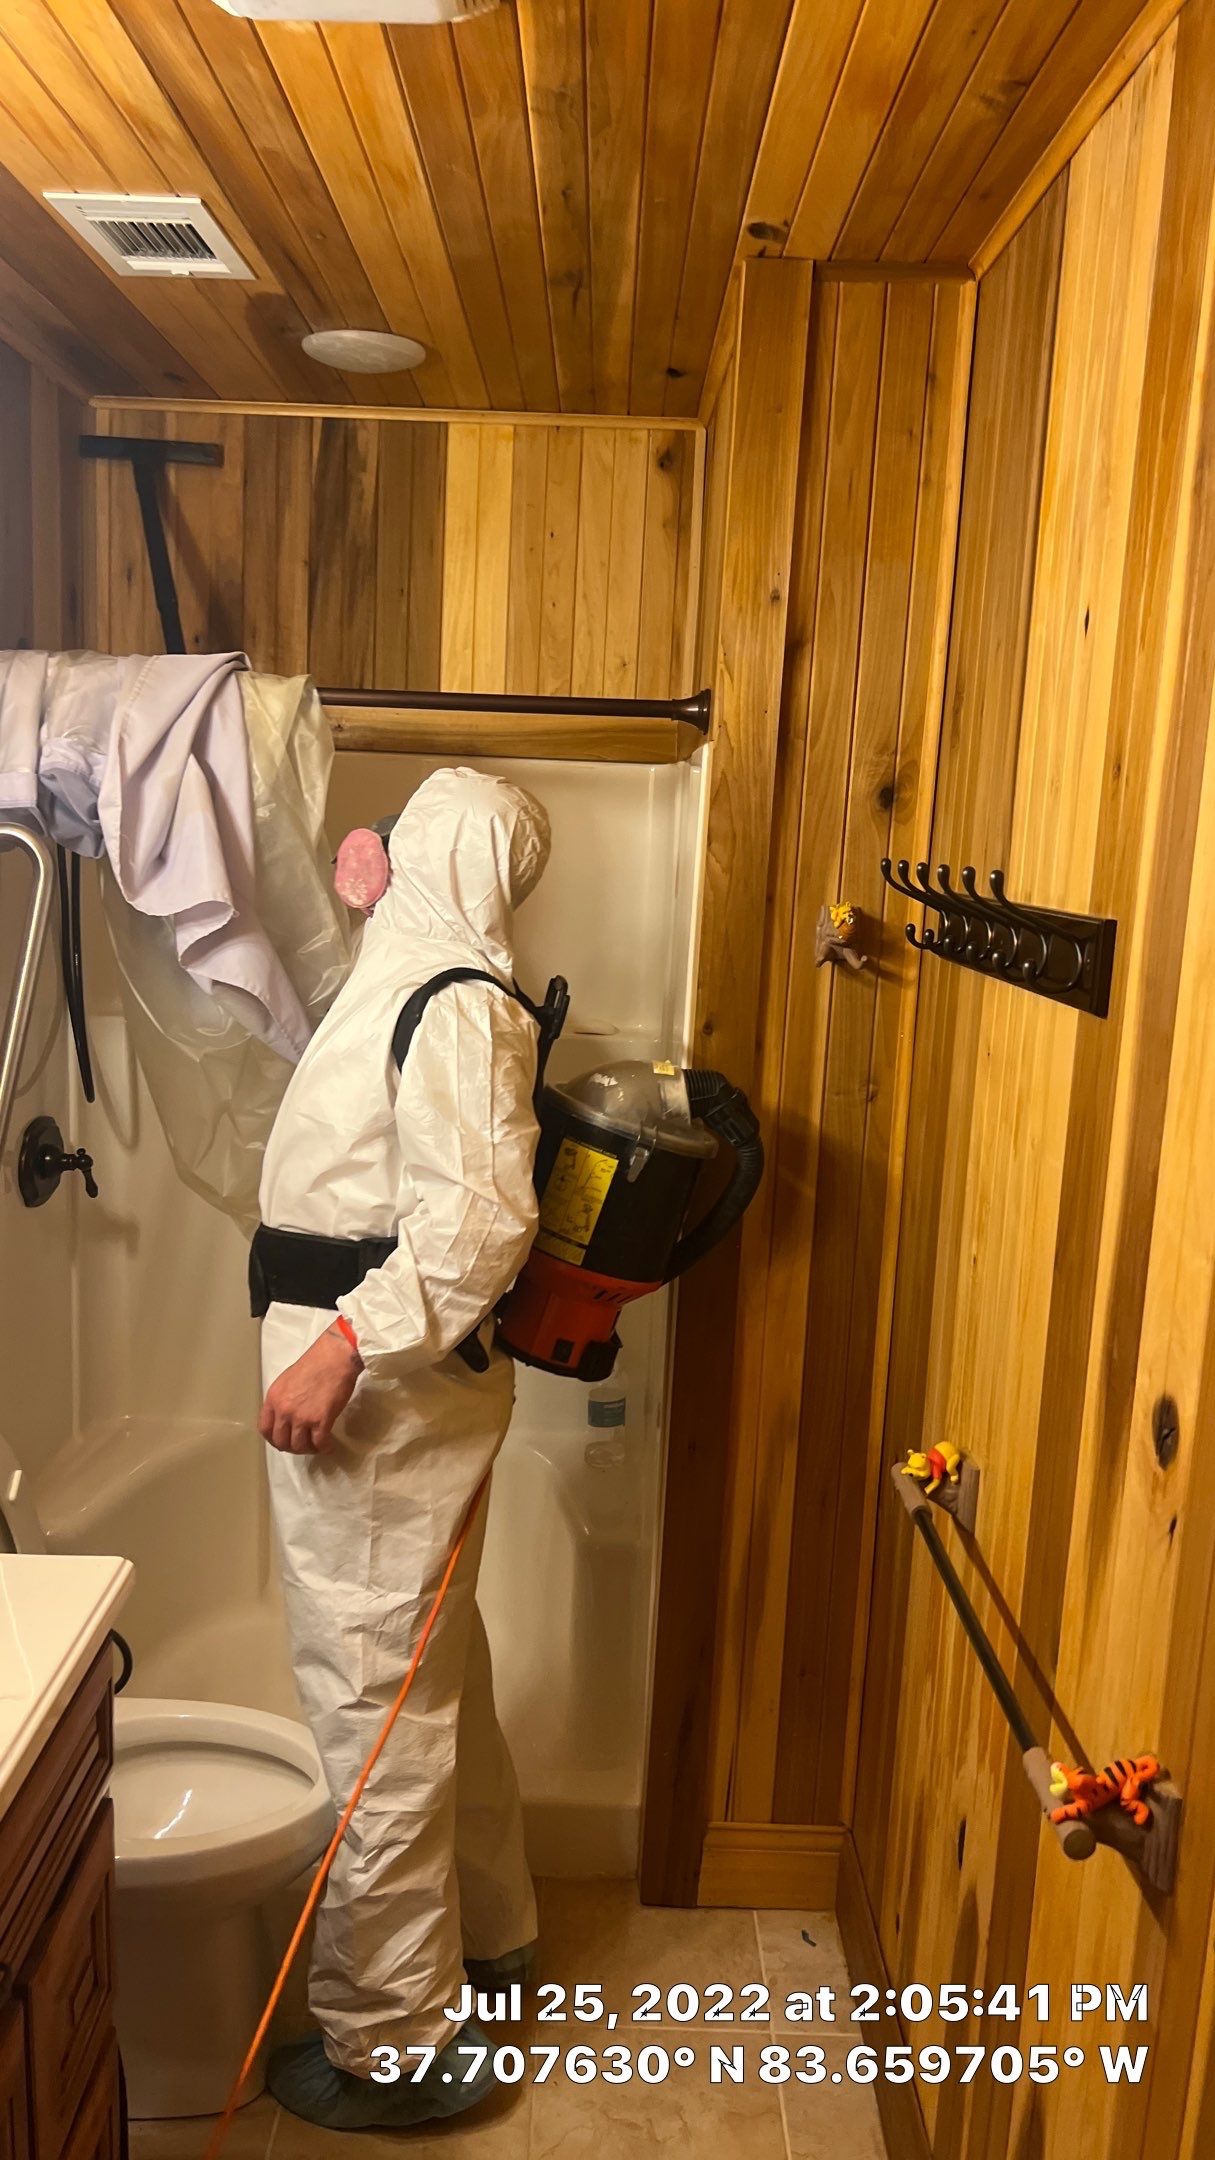
If mold has been positively identified in your house and levels are higher than the outside levels, either by visual examination or through mold testing, remediation can safely remove it. Properly trained and equipped professionals use specialized equipment (like hepa vacuums and air scrubbers with HEPA filters) to keep mold spores contained while they remove contaminated materials and treat colonized areas with antimicrobial spray.
Here’s an example of the steps involved in professional mold remediation:
- Contain work area and apply negative air pressure HEPA (AFDs) to prevent cross-contamination. If spores spread, the colonies can easily regrow elsewhere in your home.
- Protocol from a professional mold Assesor will show where to place critical barriers, containment and AFDs.
- Hepa vacuum to capture spores to be took offsite and disposed of.
- Mist an EPA-registered antimicrobial to suspend and kill mold spores.
- Remove affected building materials.
- Bag and dispose of contaminated materials properly.
- Treat cavities/underlayment and dehumidify.
- Abrasively remove dead loose mold.
- Apply EPA-registered protective sealer.
- Perform post remediation verification clearance.
- Remove drying equipment.
A key component to a successful mold remediation or removal after eliminating the mold is ensuring that the water source that caused the mold colonization is also remediated.
If you think there’s mold in your home, contact the best mold remediation experts
best mold remediation experts
-
Tips For Cleaning A Sewage Overflow
Steps in an Effective Approach to Cleaning up a Sewage Spill
- Immediate response to a sewage spill for safety of building occupants and for damage control are given
at SEWAGE BACKUP, WHAT TO DO. If you have not read that article, do so, then return here. There we discuss building entry hazards such as electrical shock and other immediate risks. - Inspect for scope of sewage backup & contamination: an inspection of the building interior and exterior is required to make sure that the scope of cleanup and disinfection will be adequate following any sewage or plumbing drain backup or leak.
An inspection for mold or other contaminants in the same area, and further cleaning needs should be made at the same time so that you do not have to do the job twice. For upper building areas
see MOLD CONTROL, FLOOD RESPONSE and for basements and crawl spaces also
see CRAWLSPACE MOLD ADVICE
Watch out: in our experience [DF] when a building has been wet enough to allow water to enter even just the very bottom of a wall cavity, there is a high risk of harmful and costly mold contamination of both the interior wall cavity surfaces as well as wall insulation.
Some materials (plaster, mineral wool or cellulose insulation) resist mold growth a bit more than others (drywall, fiberglass insulation, exposed wood surfaces).
More advice on handling wall and floor cavities where the floors have been wet is
at Step 6. FLOOD DAMAGED BUILDING CLEAN-UP for carpeting and rugs that have been wet by area or building flooding - Decide who is going to perform the clean-up of the sewage spill: yourself or a professional contractor.
- Reasons to hire a professional water restoration company:
- Your insurance company is paying for the clean-up.
- The total area of contamination and scope of work are just too large for you to handle
- Sewage spill has been in place for 24-hours or longer
- The building HVAC system (air conditioning, forced warm air heating system) has been contaminated
- You or building occupants are people at extra risk: asthmatic, elderly, compromised immune system , infants
- If you are going to perform the sewage spill cleanup yourself
- Wear rubber gloves, eye protection, rubber boots, impervious coveralls
- Do not directly touch sewage material; sewage spill or sewage contaminated materials such as carpets, clothing, furniture that contact bare skin can cause a serious infection
- Take extra care that eyes, open cuts or sores or similar high-risk areas do not come in contact with sewage; be sure to keep on eye protection when spraying or washing off items outdoors during salvage operations, as sprayed sewage droplets are unsafe.
- Wash your hands frequently; wash and disinfect clothing, gloves, boots that are to be re-used. Effective hand washing requires plenty of soap and at least 30 seconds of active scrubbing.
- Watch out: airborne water droplets of sewage contaminated water or cleaning water carry pathogens and are dangerous;
Ensure that your vaccinations are up to date for tetanus and diphtheria. Vaccinations are also available for hepatitis A.
Don’t touch fecal waste nor raw sewage with bare hands
Don’t breathe or become wet by sewage waters
Do not touch your eyes, nose, ears, nor open cuts or sores when working around sewage
Do not eat, drink, apply lip balm or lipstick (!) and do not chew gum while working with sewage cleanup
If you are accidentally wet by or touch sewage, stop and bathe.
Clean everything: after working on sewage cleanup, change out of your work clothing and bathe; clean all clothing, equipment, tools that come into contact with sewage materials by using an appropriate sanitizer, or if appropriate, discard those materials.
- Remove salvageable & non-salvageable contents & furnishings from the affected area.
Remove non-salvageable items for disposal: wet carpets and padding should have been removed and discarded as well as wet upholstered furniture & curtains. (Valuable area rugs may be able to be salvaged by professional cleaning and sanitizing). If walls are covered with plastic or vinyl wallpaper it should be removed as well to speed drying of drywall.
Use plastic bags to collect discarded materials for removal from the property.
If available, heavy-duty contractor-grade plastic bags will reduce the risk of tearing or or leaks. If you only have think kitchen garbage bags available, double-bag items for added safety.
Remove, clean, & store salvageable contents: wet contents that can be cleaned (hard-surfaced furniture, dishes, plastic items) should be removed from the sewage backup area and if weather permits, placed outdoors in a sheltered area. If weather or security do not permit that step, place salvageable items on a plastic-covered area of a concrete garage floor or similar area where the risk of cross-contamination of other building areas is minimized and where floor cleaning after salvage will be easy.
Where weather permits, complete cleaning of salvageable materials outdoors.
Be sure that cleaned salvaged items are stored dry and protected from the weather but do not bring them back into the sewage spill area until cleaning in that area and dryout of that area as well as restoration work have been completed.
For large sewage spill cleanup projects you may require a clearance inspection and testing before contents are returned to the area as well as before it can be occupied.
Tip: clothing can usually be laundered or dry-cleaned; sheets, towels, blankets and similar bedding may also be salvageable by cleaning;
Tip: take photographs of the sewage spill and of sewage or water-damaged building contents and materials to assist in a later inventory of losses. Photos can be particularly helpful if insured items must be disposed-of quickly as part of damage control for the building. - Prevent cross-contamination: measures to assure that sewage contaminated soil was not tracked into the living area, or appropriate cleaning there if needed and that airborne sewage-contaminated dust (or mold spores) are not blown to other building spaces.
- Close doors between the contaminated area and other building rooms
- Use 6-mil plastic taped as necessary at open doorways that cannot be closed.
- Seal off HVAC air intake or outlet registers for systems that are (wisely) to be left shut down during the cleaning and drying procedure.
- Use negative air (fans blowing out through one or more windows) to keep air pressure in the contaminated area lower than in the rest of the building. This step helps prevent sewage-contaminated dust from being blown to other building areas.
- Demolition & removal of wastewater-contaminated materials: remove any suspect or contaminated drywall, carpeting, carpet padding, paneling, building insulation or similar materials in the affected area.
Remove & dispose of drywall, baseboard trim, or wall paneling that have been wet by sewage.
Evaluate the porosity of remaining building materials to decide on demolition/disposal vs. cleaning. Quoting from Morey (2007):
Highly porous (permeance factor >10) materials that have been exposed to sewage backflow and have a value that exceeds the cost of restoration such as high-value rugs and carpet, upholstery, and other textiles should be removed and restored off site.
Highly porous materials with low cost or replacement value, such as carpet cushion, carpet, cardboard, tackless strip, wicker, and straw, should be removed and discarded as soon as possible. Other materials, such as saturated mattresses and cloth upholstery, regardless of value, cannot be restored and should be discarded. If disposal is necessary, these materials should be bagged in plastic for removal to a proper disposal site.
Semiporous (permeance factor of >1 to 10) materials, including items such as linoleum, vinyl wall covering and upholstery, and hardboard furniture, along with construction materials such as wood, painted drywall, and plaster, should be cleaned, disinfected, or replaced as part of the initial restoration process.
If these materials are not removed or properly disinfected, they can become reservoirs for growth of microorganisms.
Nonporous materials (permeance factor ≤1) such as Formica™, linoleum, vinyl, and tile finishing materials can be inspected for subsurface contamination with a nonpenetration moisture meter.
Although these materials may be rated as nonporous, they must be evaluated carefully because contamination can migrate from the perimeter and become trapped below the surface. If migration of contamination below the surface has not occurred, these materials may be fully restored. – Morey (2007)
Remover other sewage-contaminated contents: all porous material (cardboard, paper, books cloth) carpeting, carpet padding, upholstered furniture, mattresses, curtains, stuffed animals, wet books and similar items should be discarded. Discard food that has been contaminated or is in the contaminated area.
Also discard items for which cleaning, even if technically possible, is not cost-effective – if it costs more to clean it than to replace it, it’s trash.
Use plastic bags to collect baggable demolition materials for removal from the property.
Watch out: carpeting warning: while we frequently hear from readers whose building owner or cleaning company promise to “sanitize” wall to wall carpets that have been left in place, typically by using a carpet cleaning machine, steam, and spraying with a sanitizer. Those measures are unlikely to be effective.
It is very difficult to adequately sanitize a thick dense material like carpeting and virtually impossible to adequately sanitize carpet padding and flooring below a sewage-spilled-on carpet.
- Immediate response to a sewage spill for safety of building occupants and for damage control are given
-
Flood Cleanup Tips
Flood damage control procedures & checklist: if your building has been flooded, this article series provides an easy to understand guide for flood damage assessment, setting priorities of action, safety, and we provide special information about avoiding or minimizing mold damage.
This Building Flood Response Checklist sets priorities for what to do to protect your building from mold contamination after flooding from a burst pipe or from rising waters and area flooding. These are quick, simple steps to minimize mold damage in a flooded building.
This is the first in our series of building flood damage articles on steps to take to safely enter and repair homes or other buildings after area flooding due to hurricanes, rising floodwaters, burst pipes, or other water flooding.
We discuss safety for people entering flooded buildings, steps to preserve and protect the building from further damage after it has been flooded, how to get mechanical systems up and running again, evaluating for the need for structural repairs, demolition, and cleaning, and avoid mold in a flooded building.
- Crawl spaces (or flooded basements) that are unsafe –
Flooded crawl spaces may be contaminated with sewage bacteria, mold, rodents, or chemicals.
Flooded crawl spaces may be in danger from collapse of the structure overhead.
Watch out:There may be a danger of electrocution in crawl spaces, especially wet ones, if electrical power remains on.
- Continue to listen to a NOAA Weather Radio:
or local radio or television stations and return home only when authorities indicate it is safe to do so. Flood dangers do not end when the water begins to recede; there may be flood-related hazards within your community, which you could hear about from local broadcasts. - Do not work alone:
Watch out: if you fall or are injured and are alone you may not receive prompt assistance. If you must work alone despite this advice, be sure you have a working radio or cell phone to use to summons assistance - Drinking water
may be unavailable or it may be contaminated. Do not assume that municipal water or water from private wells is safe to drink.
- Electrocution hazards: When leaving a building because of impending flooding, leave the electricity turned OFF. Do not turn electricity back on until the building is dry and safe.
Using a portable electricity generator in a waterlogged or damaged home in a disaster area after hurricanes, earthquakes, floods can be very dangerous, risking death by electrocution, gas explosion, or by carbon monoxide poisoning. Above we also warned about electrocution hazards in buildings where the electricity has not been shut off. - Gas leak risks: Watch out for gas leaks in flooded buildings – flooding moves buildings & causes gas line leaks.
Do not Smoke Near or Inside Buildings that Have not Been Declared Safe – a ruptured gas line or leaking gas from appliances could cause a gas explosion and fire.
Do not smoke inside buildings. Smoking in a confined area can cause a fire or gas explosion. Do not turn electricity back on in a building where gas leaks could be present. Use a sealed flashlight for inspection, not a plug-in light. - Mold, Muck, Insects, Toxic Sludge & Toxic Dust Hazards exist in flooded or storm damaged buildings – a mixture of household chemicals, paints, stored gasoline, lead, sewer or septic system backup, debris and possibly asbestos.
Watch out:Do not begin cleanup efforts without understanding the hazards that may be present and be sure to use the necessary protective clothing.We also list after-flood “anti-mold” procedures that do not work or are unsafe – to help you avoid unnecessary expense in dealing with mold after a building flood.
How to Prevent Mold Growth After a Building Flood or Burst Pipe
If your building has just been flooded by rising flood waters, a burst pipe, a waste line leak, a sewer backup, or other event, immediate action may prevent a very costly mold cleanup.
As soon as it is safe to do so, respond quickly to building leaks and floods in order to minimize damage to the building.
While it may be impossible to safely enter or even inspect a building before waters have receded in areas of major flooding, hurricane or storm damage, as soon as possible the building should be inspected and the steps below begun.
- Before entering a building that has been flooded
Watch out: An initial building survey is needed to assure that a building is safe to enter.
Hazards in and around flooded buildings include risk of structural collapse, risk of septic system collapse, trip and fall injury hazards, electrical shock hazards, fire and explosion hazards where natural gas or bottled gas are present, loose or broken gas piping and gas leaks, toxic sludge and materials containing waterborne bacteria, such as the E. coli and Enterococci bacteria, toxic mold growth indoors. - Stop the water entry or other ongoing damage.
Obviously if flood waters are still rising or if a building has already become partly submerged you cannot easily stop water entry. But in other circumstances there are important steps you can take.
For example: turn off the main water shutoff valve, nail down tarps to cover openings or leaks in storm-damaged roofing, direct surface runoff away from the building. - Salvage or protect furnishings or possessions
which have not yet gotten wet by moving them to dry areas. - Remove standing water
this may mean calling the local fire department or other agencies who have special pumping equipment. - Pump out flooded basements gradually:
(about one-third of the water per day) to avoid structural damage. If the water is pumped completely in a short period of time, pressure from water-saturated soil on the outside could cause basement walls to collapse. - Inspect the building more thoroughly for structural damage and safe entry.
- Crawl spaces (or flooded basements) that are unsafe –
-
Water Damage Mitigation Tips
Flood damage control procedures & checklist: if your building has been flooded, this article series provides an easy to understand guide for flood damage assessment, setting priorities of action, safety, and we provide special information about avoiding or minimizing mold damage.
This Building Flood Response Checklist sets priorities for what to do to protect your building from mold contamination after flooding from a burst pipe or from rising waters and area flooding. These are quick, simple steps to minimize mold damage in a flooded building.
This is the first in our series of building flood damage articles on steps to take to safely enter and repair homes or other buildings after area flooding due to hurricanes, rising floodwaters, burst pipes, or other water flooding.
We discuss safety for people entering flooded buildings, steps to preserve and protect the building from further damage after it has been flooded, how to get mechanical systems up and running again, evaluating for the need for structural repairs, demolition, and cleaning, and avoid mold in a flooded building.


Dont Let Water Damage Destroy Your House
Call For An Inspection: (859)302-2702
We Servere:
Lexington, Kentucky
Richmond,Kentucky
Newby,Kentucky
Nicholasvillle,Kentucky
Georgetown, Kentucky
Winchester, Kentucky
Follow Me On
Subscribe To My Newsletter
Subscribe for new travel stories and exclusive content.
