-
cigarette smoke odor removal, fire damage restoration, lexington, kentucky, mold inspection company, mold removal service, smoke odor removal, Water Damage, water damage cleanup, water damage cleanup company, water damage mitigation, water damage mitigation company, water damage restoration, water removal service near me, water restoration company
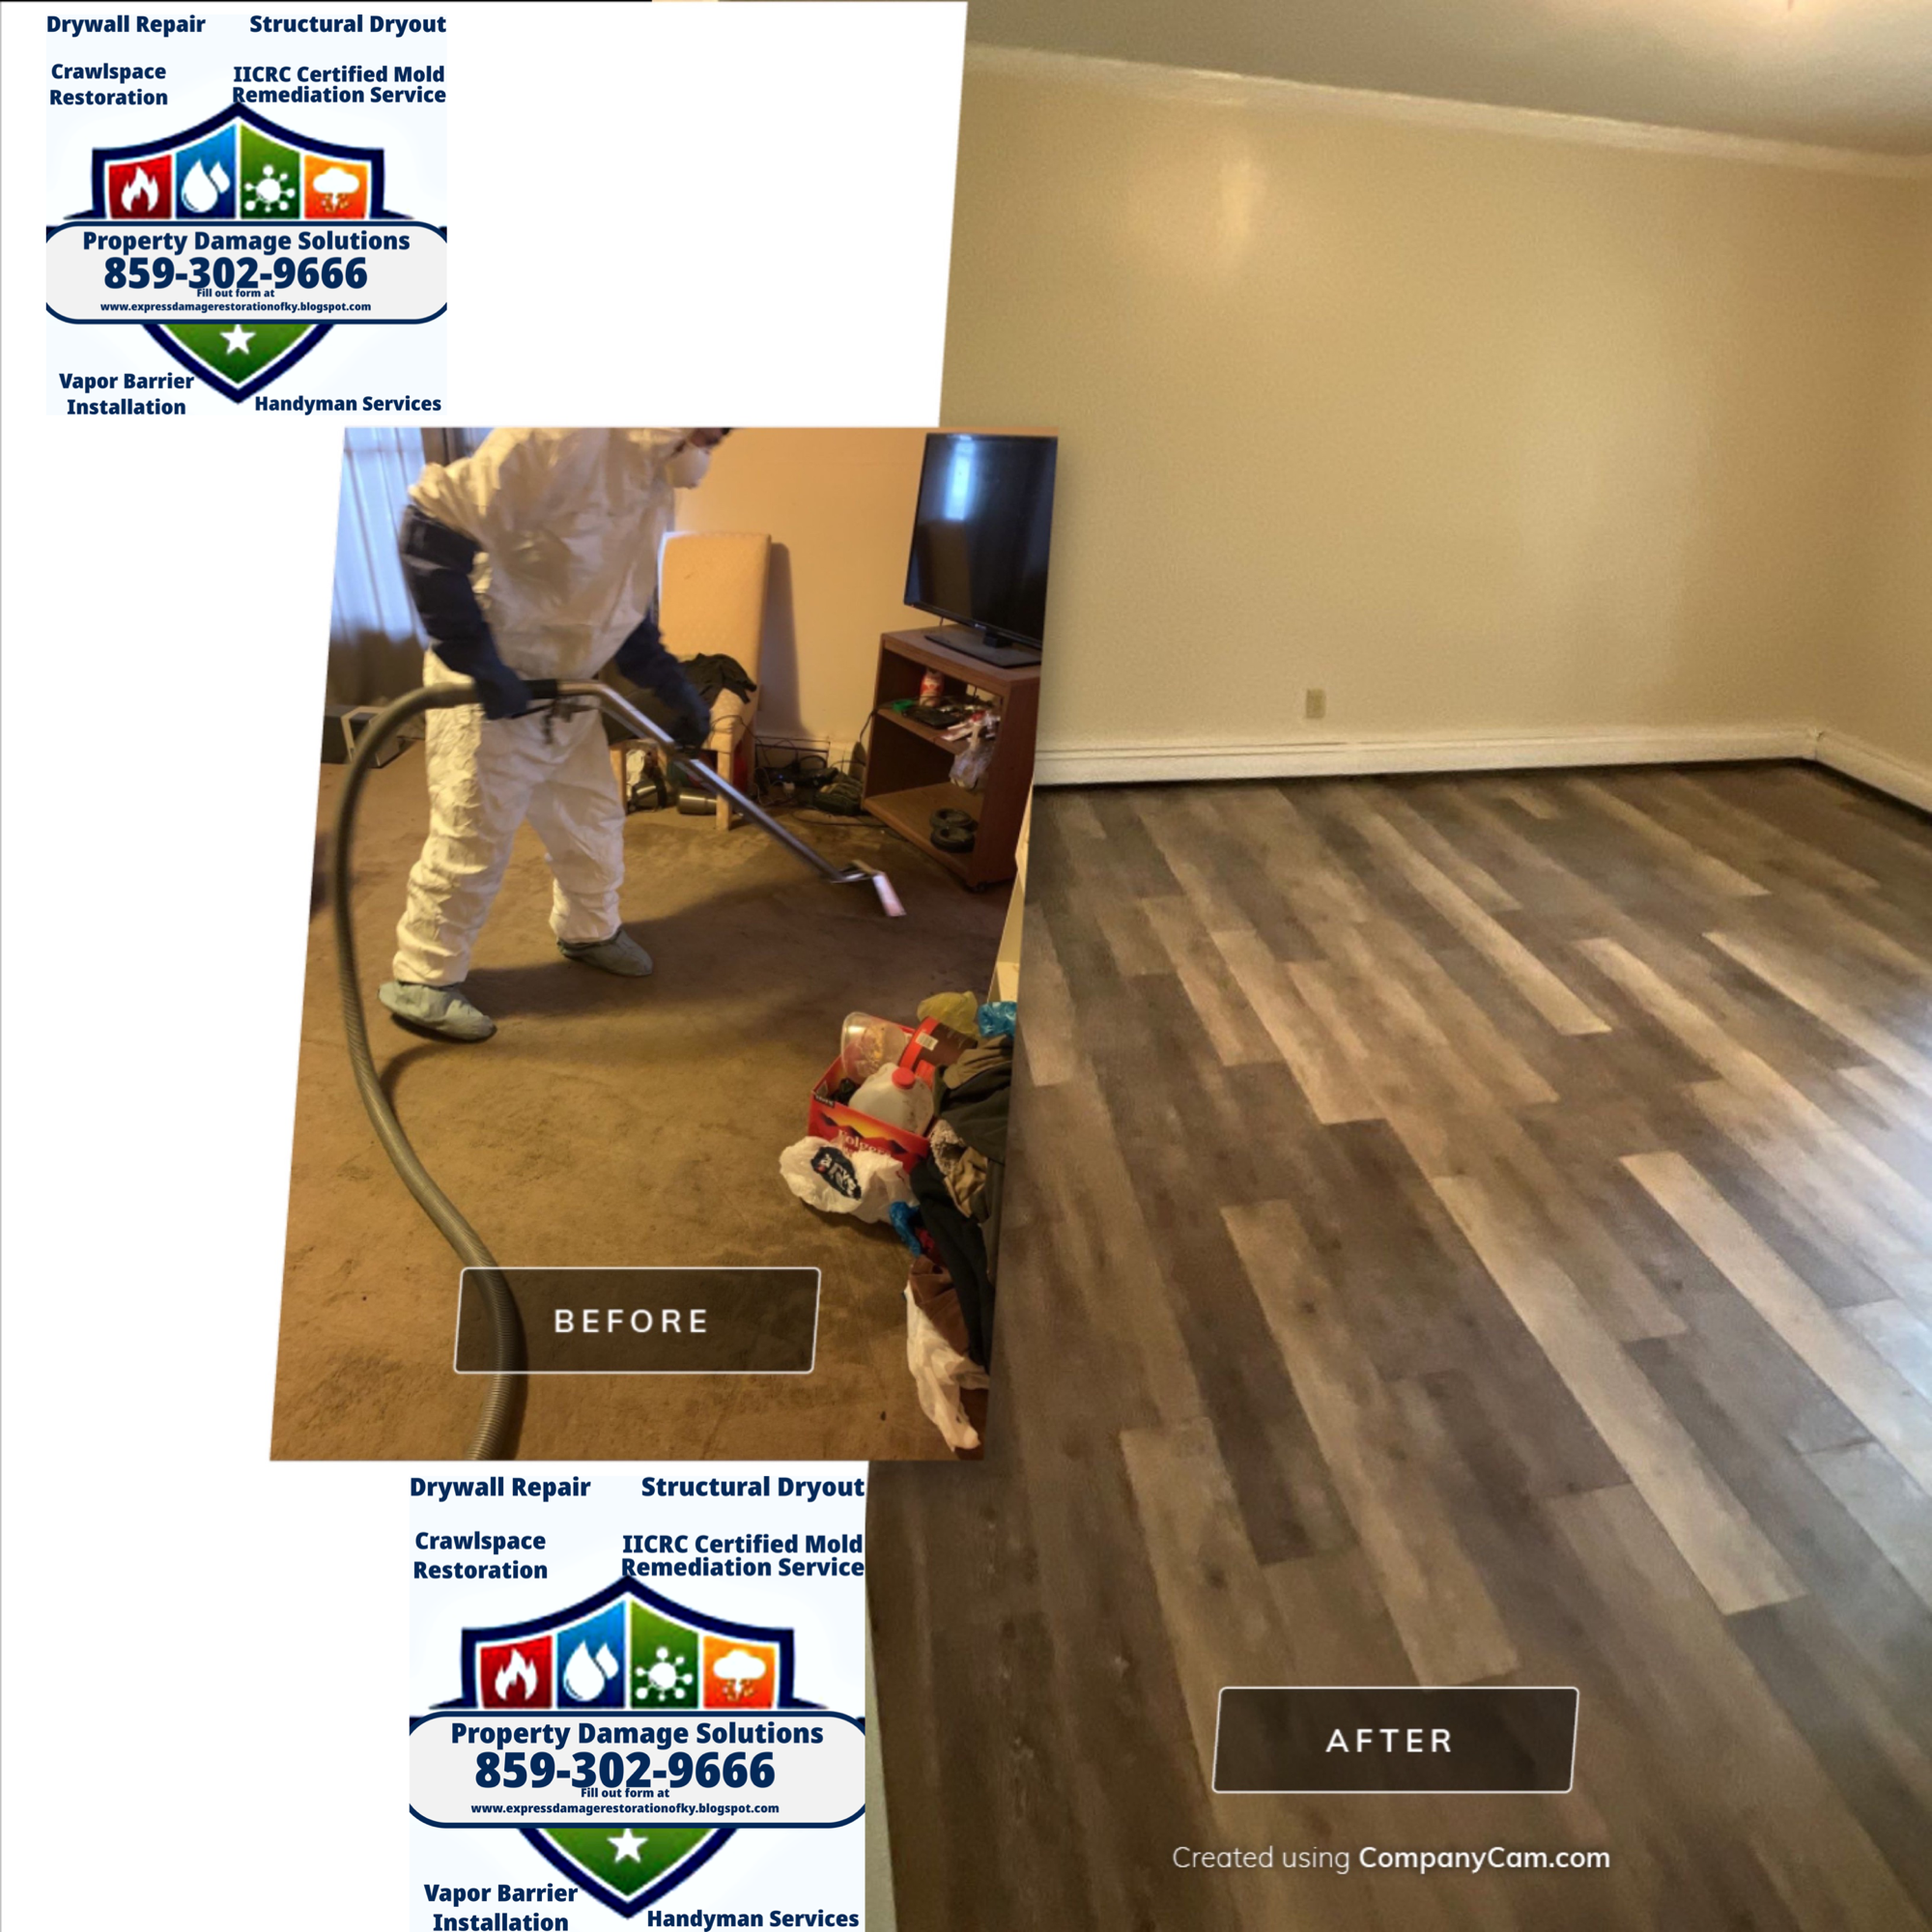
7 Hidden Signs of Water Damage in Your Home or Business
Serving All Of Central Kentucky


We are an IICRC Water Damage Restoration Master Restorers

Book Now

We Are Also IICRC Certified Master Fire Damage Restorers Click To Book
24 HR Water Removal Services Click To Call
-
The Importance of Exterior and Interior Waterproofing

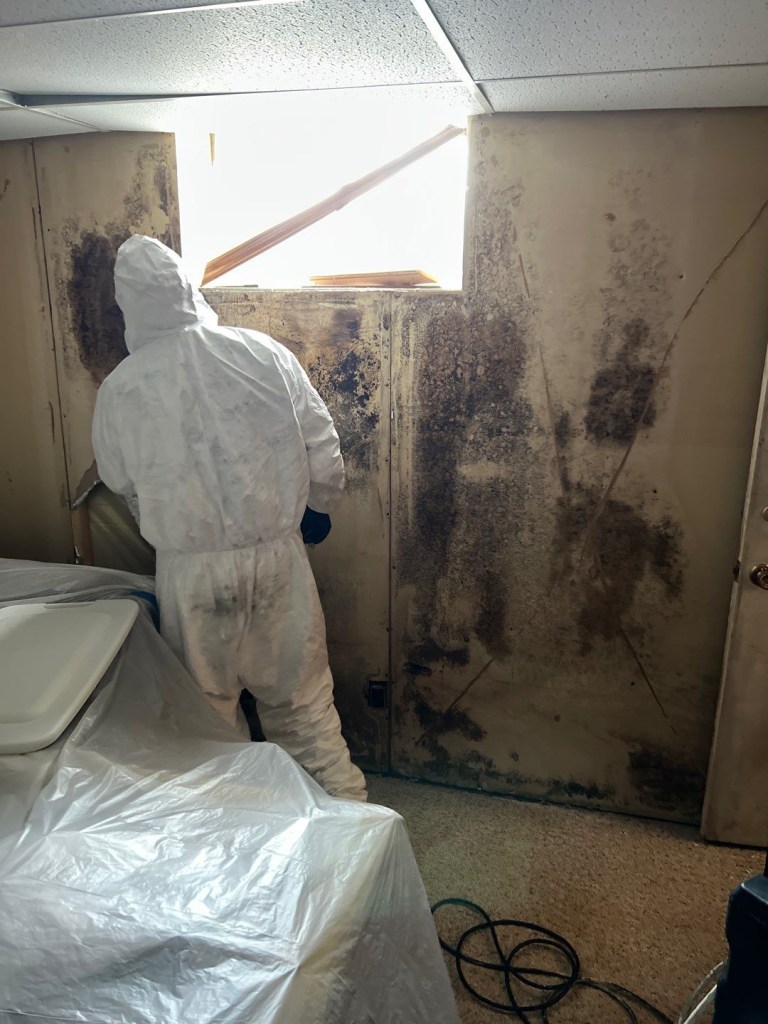
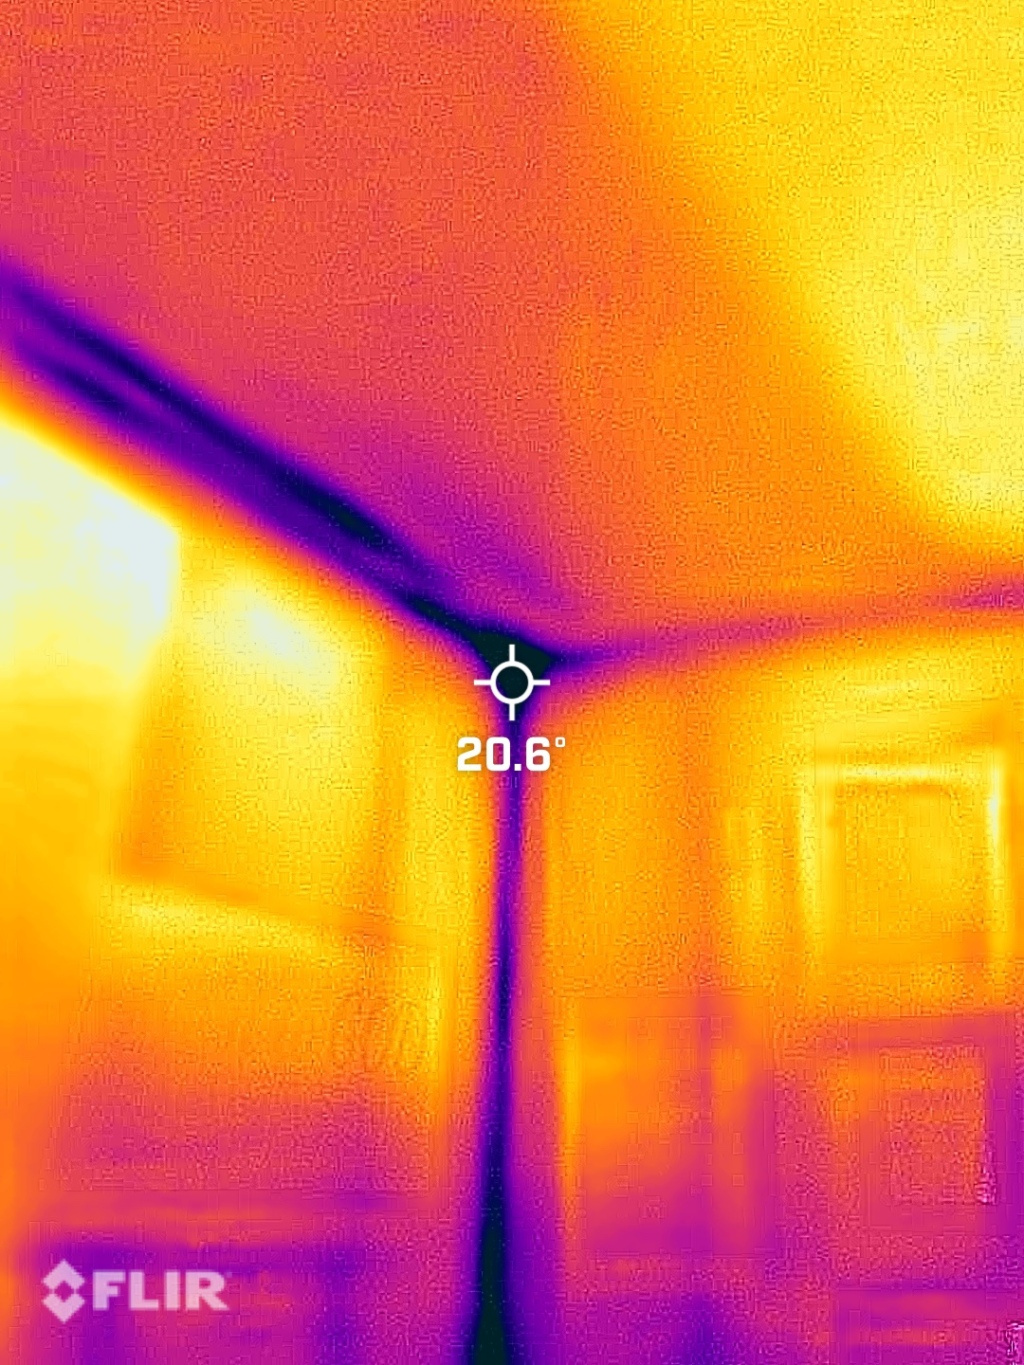
This basement was below grade, the waterproofing product used to seal the exterior when constructed, had degraded and delaminated over time. The Importance of Exterior and Interior Waterproofing
Waterproofing is an essential aspect of maintaining the structural integrity and longevity of any property. Whether it’s a residential home, a commercial building, or an industrial facility, ensuring that both the exterior and interior are well-protected from water damage can save you significant time, money, and stress in the long run. Here’s why you might need exterior or interior waterproofing and how it can benefit your property.
Understanding Exterior Waterproofing
Exterior waterproofing focuses on protecting the outer structure of a building from water infiltration. This type of waterproofing is crucial for several reasons:
- Preventing Structural Damage: Water seepage can weaken the foundation, leading to cracks and structural instability. Exterior waterproofing helps keep water away from the foundation, preserving its strength and durability.
- Mold and Mildew Prevention: Moisture can create an ideal environment for mold and mildew growth, which can cause health issues and damage building materials. Exterior waterproofing reduces the risk of mold and mildew by keeping water out.
- Enhancing Property Value: A well-maintained, waterproofed exterior can increase your property’s market value. Potential buyers are likely to pay more for a home or building that doesn’t have water damage issues.
- Energy Efficiency: Waterproofing can also improve your property’s energy efficiency. Proper insulation and waterproofing can help maintain indoor temperatures, reducing the load on heating and cooling systems.
The Role of Interior Waterproofing

Annual inspections are needed to maintain waterproofing efforts all of our waterproofing installations come with regular maintenance and inspections Interior waterproofing is equally important and serves as an additional line of defense against water intrusion. Here’s why you might need interior waterproofing:
- Basement Protection: Basements are particularly susceptible to water infiltration. Interior waterproofing helps keep basements dry, preventing damage to personal belongings and reducing the risk of mold growth.
- Mitigating Existing Water Problems: If your property already has water issues, interior waterproofing can help manage and reduce the impact. This approach includes installing sump pumps, interior drainage systems, and waterproof coatings.
- Health and Safety: A dry interior environment is crucial for maintaining good indoor air quality. Waterproofing helps prevent mold and mildew, which can cause respiratory problems and other health issues.
- Longevity of Building Materials: Water damage can cause significant wear and tear on building materials. Interior waterproofing protects walls, floors, and other structures from moisture, prolonging their lifespan.
Choosing the Right Waterproofing Solution
Determining whether you need exterior or interior waterproofing—or both—depends on your specific situation. Here are some factors to consider:
- Climate and Weather Conditions: Properties in areas with high rainfall or prone to flooding may benefit more from exterior waterproofing.
- Age and Condition of the Property: Older properties with existing water damage may require comprehensive interior waterproofing solutions.
- Budget and Resources: While exterior waterproofing is typically more expensive, it offers long-term benefits. Interior waterproofing can be a cost-effective solution for managing current issues.
Professional Waterproofing Services
IICRC Water-Mold-Smoke-Fire Damage Certified Professionals Call ☎️ 859-267-3482 At Property Damage Solutions, we specialize in both exterior and interior waterproofing services. Our team of experts can assess your property, identify potential water intrusion points, and recommend the best solutions to protect your investment.
Conclusion
Waterproofing is not just an optional upgrade; it’s a necessary step to protect your property from the damaging effects of water. Whether you need to safeguard the exterior, manage existing interior issues, or both, professional waterproofing services can help you maintain a safe, dry, and valuable property. Contact us today to learn more about our comprehensive waterproofing solutions and how we can help you achieve peace of mind and long-term property protection.
For more information, visit Property Damage Solutions or give us a call at 859-302-9666. Let us help you keep your property safe from water damage.
-
Understanding Whiskey Fungus: Causes, Effects, and Prevention

Whiskey Fungus Is A Black Mold Whiskey fungus, also known as Baudoinia compniacensis, is a type of black mold that commonly grows on buildings and structures near whiskey distilleries and other facilities where ethanol is produced. While whiskey fungus itself does not pose significant health risks to humans, it can cause aesthetic and structural damage to buildings and outdoor surfaces. In this article, we’ll explore the causes, effects, and prevention measures for whiskey fungus.
Causes of Whiskey Fungus:
Whiskey fungus thrives in environments with high levels of ethanol vapor, which are typically found near distilleries, breweries, and other industrial facilities where alcohol is produced. The fungus feeds on the ethanol vapors released during the fermentation and aging processes, as well as on other organic compounds present in the air.

Houses Near Distilleries Commonly Need Pressure Washed And Treated Effects of Whiskey Fungus:
- Aesthetic Damage: The most noticeable effect of whiskey fungus is the black staining it creates on outdoor surfaces such as buildings, fences, and trees. These unsightly stains can detract from the appearance of properties and structures, leading to concerns among property owners and communities.
- Structural Damage: In addition to aesthetic concerns, whiskey fungus can also cause structural damage to buildings and other surfaces over time. The fungus can penetrate and degrade certain types of building materials, including wood, concrete, and metal, potentially compromising their integrity and longevity.
- Environmental Impact: Whiskey fungus releases spores into the air, which can spread and settle on nearby vegetation, soil, and water bodies. While the impact of whiskey fungus on the environment is relatively minimal compared to other types of pollution, it can still contribute to ecological changes in affected areas.

We use a plant based anti microbial in our monthly treatments for clients as well as thorough inspections to the most vulnerable areas of the home. These monthly treatments are for any microbes as well as whiskey fungus. Prevention of Whiskey Fungus:
- Site Selection: When planning the location of a distillery or industrial facility, consider the surrounding environment and potential impacts on nearby properties. Choose sites with adequate distance from residential areas and sensitive ecosystems to minimize the risk of whiskey fungus growth.
- Emissions Control: Implement measures to control and reduce emissions of ethanol vapors and other organic compounds from production processes. This may include installing vapor recovery systems, improving ventilation, and optimizing fermentation and aging techniques to minimize emissions.
- Surface Treatments: Apply protective coatings or sealants to outdoor surfaces to create a barrier against whiskey fungus growth. These treatments can help prevent the fungus from establishing a foothold and make it easier to clean and remove any staining that does occur.
- Regular Maintenance: Implement a regular maintenance schedule to inspect and clean outdoor surfaces for signs of whiskey fungus growth. Promptly remove any black stains using appropriate cleaning methods and products to prevent further spread and damage.
- Community Engagement: Foster open communication and collaboration with local communities and stakeholders to address concerns related to whiskey fungus. Educate residents and property owners about the causes and effects of the fungus and involve them in discussions about prevention and mitigation strategies.
Conclusion:
Whiskey fungus may not pose a direct health risk to humans, but its presence can have significant aesthetic and structural impacts on buildings and outdoor surfaces near distilleries and industrial facilities. By understanding the causes of whiskey fungus and implementing proactive prevention measures, we can minimize its effects and preserve the integrity and beauty of our communities.
For professional assistance with whiskey fungus removal and prevention, contact Property Damage Solutions at (859) 302-9666 or email propertydamage123@gmail.com.
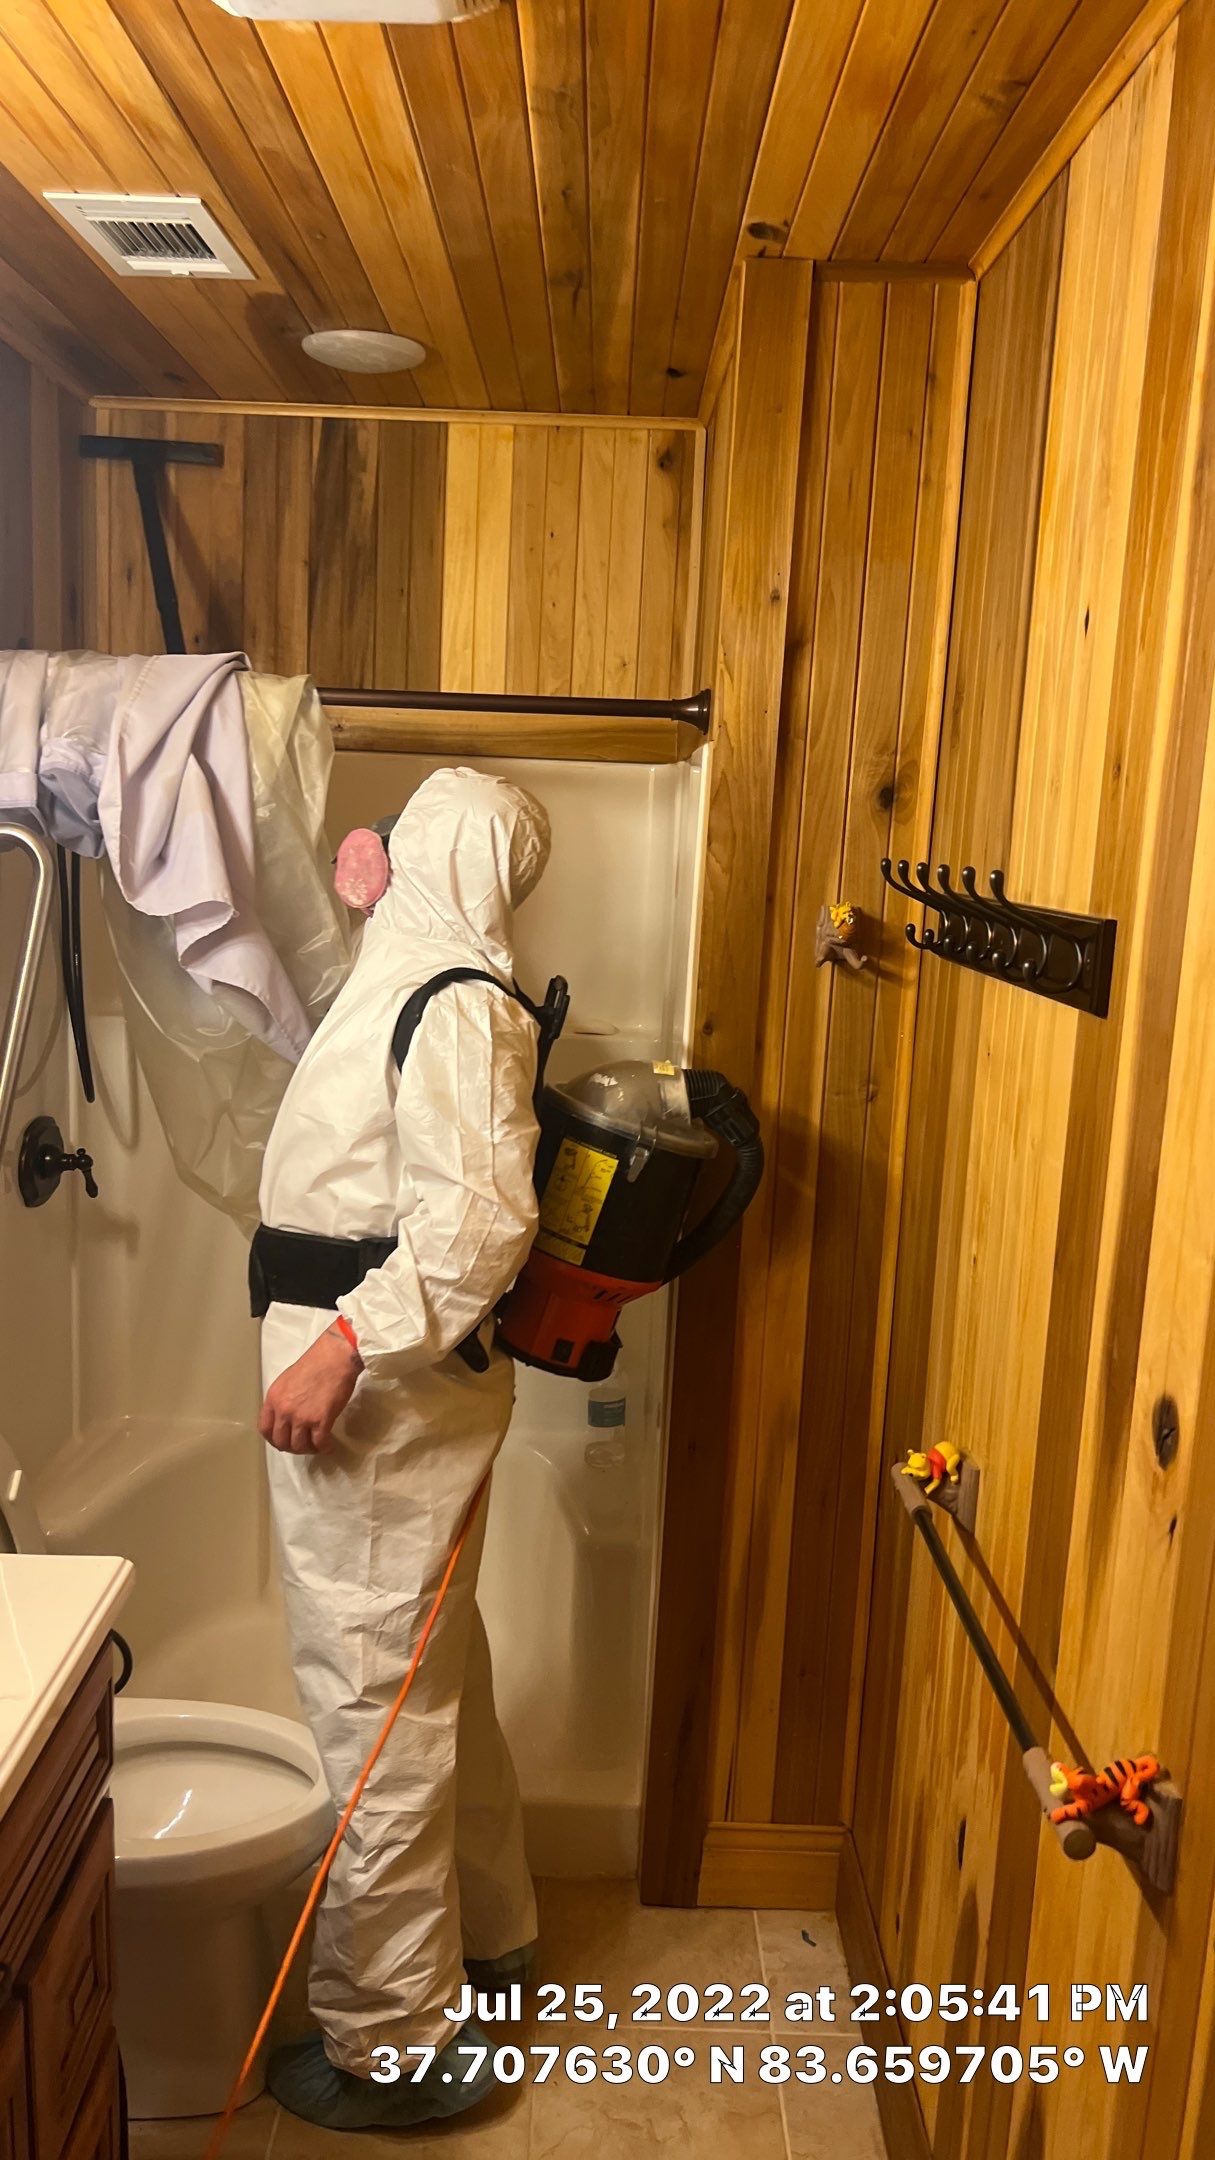
We Are IICRC Certified Mold Removal Specialists Call, Text, Email, we do emergency water extraction 24/7/365
-

Emergency Water Extraction from Basements and Crawlspaces in Richmond, Kentucky
Emergency Water Extraction from Basements and Crawlspaces in Richmond, Kentucky
When disaster strikes, swift action is crucial to minimize damage and restore normalcy. At Property Damage Solutions, we specialize in emergency water extraction services for basements and crawlspaces in Richmond, Kentucky, and surrounding areas of central Kentucky. With our prompt response and expertise, we’ll help you mitigate water damage effectively, ensuring your property is restored to its pre-loss condition.
Expert Water Extraction Services
Our team of skilled professionals is equipped with state-of-the-art equipment and industry-leading techniques to tackle water emergencies of any scale. Whether it’s a burst pipe, flooding, or any other water-related catastrophe, we’re here to provide swift and efficient water extraction services.
Comprehensive Assessment and Planning
Upon arrival at your property, our certified technicians will conduct a thorough assessment of the water damage. We’ll determine the extent of the damage and formulate a tailored plan to address the situation effectively. Our goal is to minimize disruption to your life and property while ensuring thorough water extraction and drying.
Advanced Equipment and Techniques
At Property Damage Solutions, we utilize advanced water extraction equipment, including powerful pumps, extractors, and dehumidifiers, to remove water quickly and efficiently. Our team is trained in the latest techniques for water removal and structural drying, ensuring that your property is dried thoroughly to prevent mold growth and structural damage.
24/7 Emergency Response
Water emergencies can happen at any time, day or night. That’s why we offer 24/7 emergency response services to our clients in Richmond, Kentucky, and the surrounding areas. You can count on us to be there when you need us the most, ready to provide immediate assistance and peace of mind.
Licensed, Bonded, and Insured
Property Damage Solutions is a licensed, bonded, and insured water damage restoration company. We adhere to the highest industry standards and regulations to ensure the safety and satisfaction of our clients. With us, you can rest assured that your property is in capable hands.
Contact Us Today
 Call ☎️ 859-302-9666
Don’t let water damage wreak havoc on your property. If you’re facing a water emergency in your basement or crawlspace, don’t hesitate to contact Property Damage Solutions at 859-302-9666. Our team is standing by to provide prompt, professional assistance and help you restore your property to its former glory.
-
How Does A.T.P testing work

The following article explains; How Does A.T.P testing work.
ATP (Adenosine Triphosphate) testing is a method used to determine the presence of biological contamination, such as bacteria, yeast, or mold, in a sample. The test works by measuring the amount of ATP (a molecule found in all living cells) in a sample using a luminometer.

A.T.P Testing With A Luminometer Typically, the sample is mixed with a reagent called luciferin, which reacts with ATP to produce light. The amount of light produced is proportional to the amount of ATP present in the sample. The light emission is then measured by the luminometer, and the result is reported in relative light units (RLU). High RLU values indicate high levels of ATP and therefore high levels of biological contamination.
ATP testing is widely used in a variety of industries, including food safety, environmental monitoring, and healthcare, as a quick and simple way to assess the level of hygiene and cleanliness in a given area.
-
lexington, kentucky, mold damage, mold inspection company, mold remediation, mold removal, richmond,Kentucky, Water Damage, water damage cleanup, water damage cleanup company, water damage mitigation, water damage mitigation company, water damage restoration, water removal service near me, water restoration company
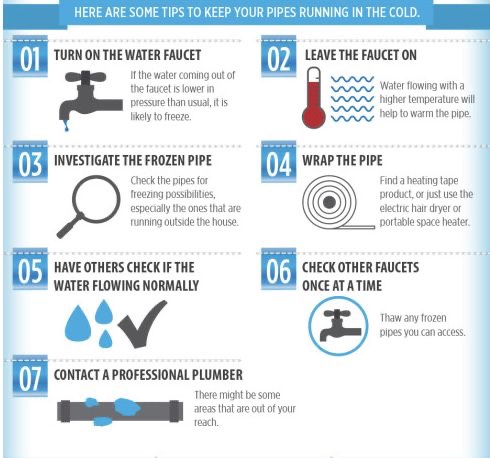
How to thaw frozen pipes

For emergency water removal call ☎️ (859)302-2702
Old man winter is unbearable as it is, water damage from burst frozen pipes in the middle of it can be a nightmare. Should your pipes freeze, the following will give you tips on how to thaw frozen pipes.

Tips on thawing frozen water pipes to parent water damage Thawing Frozen Pipes
What to do if a pipe bursts
https://www.lex18.com/news/unprecedented-number-of-water-pipes-break-in-lexington?_amp=true
If a pipe bursts in your home, you’ll need to act fast to mitigate additional damage. Shut off your water as quickly as possible. This will help minimize the amount of water that seeps out inside your walls. You may also want to shut off power in the affected area of your home. After you’ve taken these precautionary steps, it’s time to call a plumber and start mopping up any mess that’s been caused. Try to remove as much of the water and lingering moisture as you can to avoid mold and mildew buildup. Depending on the severity of your case, you may also need to bring in other professionals to address damage to your walls, carpet, flooring or ceiling.
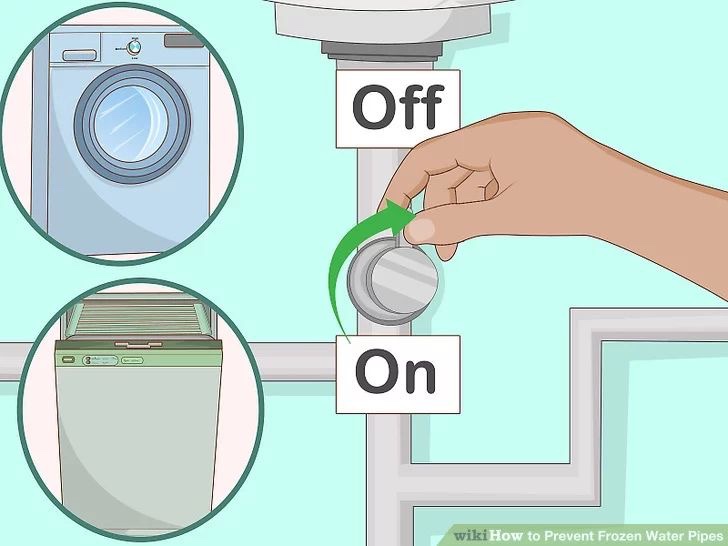
Shit water off to prevent water damage in case a pipe bursts How to thaw out pipes
How can you tell if your pipes are frozen? If you turn on the bathroom or kitchen faucet and see only a few drops or a trickle of water, this could indicate that water inside the pipes has frozen – preventing a free flow. But don’t panic. You may be more equipped to deal with the situation than you think. Here’s a quick lesson on how to thaw a frozen pipe.
Step 1. Turn on the faucet
Keep it running. Allowing the faucet to drip even slightly can help prevent a pipe from bursting. It’s simple – when freezing takes place, extreme pressure builds between the faucet and the ice blockage. An open faucet relieves this pressure buildup, in turn preventing a burst from occurring.
Step 2. Apply heat to the frozen area, thermal energy promotes drying.
Slowly apply heat using a hair dryer. There are several ways to do this. You can wrap the pipes in thermostatically controlled heat tape, or you can use an external heat source such as a hair dryer or space heater. Do not use a propane torch as this can damage the pipe and present a fire risk.
If you decide to use a hair dryer, begin directing air close to the faucet end of the pipe and gradually move toward the coldest section. Be careful not to overheat the hair dryer or blow a fuse. Remember, the faucet should be left on while heat is being applied.
Step 3. Continue to apply heat
Don’t stop heating until full water pressure is restored. Even then, it’s a good idea to leave the faucet open for a few minutes after the pipe is thawed. This will give the ice time to completely clear from the line.
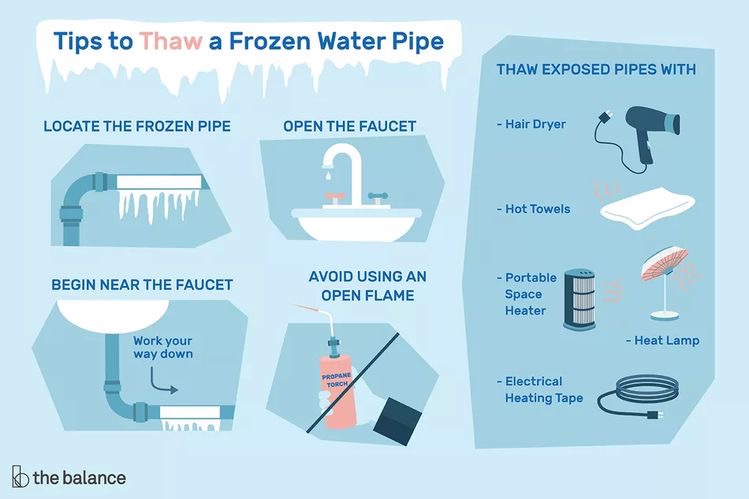
Ways to thaw frozen pipes Step 4. Check all faucets and prevent pipes from freezing in the future
Check each faucet in your home for any other frozen pipes. One frozen pipe may mean that others have been affected as well.
If the problem persists, contact a plumber. You can prevent pipes from freezing again by taking a few simple steps:
Before traveling, keep the temperature in your home above freezing and turn off all the water to your house.
Be sure to keep all water pipes, especially those close to outside walls, insulated with foam rubber or heating cable.
Keep cabinet doors open to allow air to circulate.
Let your faucets drip cold water – it is harder for a pipe to freeze even if there is a trickle of water flowing through. In order to not waste water, you can collect the drops and reuse it, possibly for cleaning or watering plants.
How long does it take for pipes to unfreeze?
Using any of the handful of methods on how to thaw frozen pipes will typically take about 30 minutes. This can vary depending on the weather, how long the pipe has been frozen and where the pipe is located. Any of these factors can cause the thawing process to take longer.2
And remember, a frozen pipe isn’t the only issue that comes with cold weather. Find out other ways to protect your home during the winter.
Ways to prevent frozen pipes Quick tip on drying if you have a pipe burst, find out the GPP (grains per pound) inside your home and then outside, you can do this by purchasing a thermometer hydrometer. If the gpp is lower outside than inside, then you can dry your home with what is known in the water damage restoration industry as “an open drying system. Click to check out our mold damage prevention tips there is more tips on how to dry a house out after water damage without water damage restoration equipment.
-
Fire Damage Restoration
Are you dealing with the aftermath of a fire at your property? Look no further than Property Damage Solutions, your trusted fire damage restoration experts.
Our team of experienced professionals understands the devastating effects of a fire and is here to help you get your property back to pre-loss condition. We use state-of-the-art equipment and techniques to restore your property as quickly and efficiently as possible.
One of the innovative technologies we use in our fire damage restoration process is ultra sonic cleaners. These powerful machines use sound waves to create microscopic bubbles in a cleaning solution, which then gently remove dirt and debris from delicate surfaces, such as electronics and other items that cannot be cleaned by traditional methods.
This cutting-edge technology allows us to restore even the most delicate items in your home or business that have been affected by smoke, soot, or fire damage. Our ultra sonic cleaners are just one of the many tools we use to ensure a thorough and effective restoration process.
At Property Damage Solutions, we know that dealing with a fire can be overwhelming, but we are here to help you every step of the way. Our team will work with you to develop a customized restoration plan that meets your specific needs and gets you back on track as soon as possible.
Don’t let fire damage restoration take control of your life. Contact Property Damage Solutions today and let us help you restore your property and your peace of mind. ☎️ (502)503-1902

-
Fire Damage Restoration with Ultrasonic Cleaning
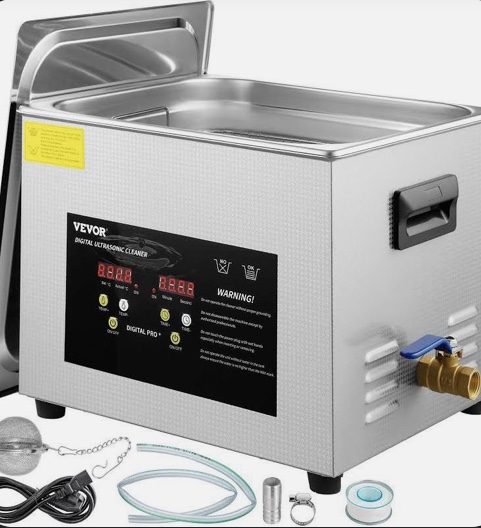
Ultra Sonic Cleaner Ultra sonic cleaners are becoming an increasingly popular tool in the field of fire damage restoration. Fire damage restoration can be a complex and time-consuming process, and fire damage restoration with ultrasonic cleaners can help speed up the process and improve the overall results.
Fire Damage Restoration Company Fire damage can leave behind a variety of residues, including soot, ash, and smoke damage. These residues can be difficult to remove and can cause long-term damage to surfaces and materials. Traditional cleaning methods can be time-consuming and labor-intensive, often requiring the use of harsh chemicals and aggressive scrubbing techniques. Ultrasonic cleaners, on the other hand, offer a fast, efficient, and gentle alternative.
Reliable Fire Damage Restoration Services
Ultrasonic cleaners use high-frequency sound waves to create tiny, high-energy bubbles in a cleaning solution. These bubbles are powerful enough to penetrate into the tiniest crevices and cracks, removing even the most stubborn dirt and grime. The cleaning solution used in ultrasonic cleaners is typically a mild detergent or other cleaning agent that is safe for use on a wide range of materials.

A stopped up dryer vent can cause fire damage One of the key benefits of ultrasonic cleaners is their ability to clean delicate or sensitive materials without causing damage. Many fire-damaged items, such as electronics, jewelry, and artwork, require specialized cleaning techniques to prevent further damage. Ultrasonic cleaners can safely and effectively clean these items without the need for harsh chemicals or abrasive scrubbing.
Best Fire Damage Restoration Company In Kentucky
Another benefit of ultrasonic cleaners is their ability to remove odors. Fire damage often leaves behind a strong, lingering odor that can be difficult to eliminate. Ultrasonic cleaners can help break down the odor-causing particles and remove them from the surface of the affected items.
When using ultrasonic cleaners for fire damage restoration, it is important to work with a professional restoration company that has experience using this technology. Ultrasonic cleaning requires specialized equipment and expertise to ensure that the process is performed safely and effectively. A professional restoration company can assess the extent of the damage, determine which items can be restored using ultrasonic cleaning, and create a customized cleaning plan.
In conclusion, ultrasonic cleaners are an effective tool for fire damage restoration. They offer a fast, efficient, and gentle cleaning solution that can remove even the most stubborn dirt, grime, and odors. If you have experienced fire damage in your home or business, consider working with a professional restoration company that uses ultrasonic cleaning technology to help restore your belongings to their pre-loss condition.
Fast Fire Damage Restoration Company

Are you dealing with the aftermath of a fire at your property? Look no further than Property Damage Solutions, your trusted fire damage restoration experts.
Our team of experienced professionals understands the devastating effects of a fire and is here to help you get your property back to pre-loss condition. We use state-of-the-art equipment and techniques to restore your property as quickly and efficiently as possible.
One of the innovative technologies we use in our fire damage restoration process is ultra sonic cleaners. These powerful machines use sound waves to create microscopic bubbles in a cleaning solution, which then gently remove dirt and debris from delicate surfaces, such as electronics and other items that cannot be cleaned by traditional methods.
This cutting-edge technology allows us to restore even the most delicate items in your home or business that have been affected by smoke, soot, or fire damage. Our ultra sonic cleaners are just one of the many tools we use to ensure a thorough and effective restoration process.
At Property Damage Solutions, we know that dealing with a fire can be overwhelming, but we are here to help you every step of the way. Our team will work with you to develop a customized restoration plan that meets your specific needs and gets you back on track as soon as possible.
Don’t let fire damage take control of your life. Contact Property Damage Solutions today and let us help you restore your property and your peace of mind. Give us a call ☎️ (502)503-1902 Serving all of Central Kentucky.
-
Professional Water Damage Restoration Company in Georgetown Kentucky
Welcome to our professional water damage restoration company in Georgetown Kentucky and serving all of Central Kentucky! If you’ve experienced the devastating effects of water or fire damage to your property, you need a trusted partner to help you get things back to normal as quickly and efficiently as possible. That’s where we come in.
Professional Water Damage Restoration Company In Georgetown Kentucky
Our team of experienced professionals has years of expertise in handling all types of water and fire damage restoration projects. We understand that every situation is unique, and we work closely with our clients to provide tailored solutions that meet their specific needs.
Our comprehensive restoration services include water extraction, structural drying, mold remediation, and smoke and soot cleanup. We use state-of-the-art equipment and techniques to ensure that your property is restored back to its pre-loss condition as quickly and efficiently as possible.
We’re proud to offer our services to both residential and commercial clients in central Kentucky. No matter the size or complexity of the project, we’re committed to delivering fast, reliable, and affordable solutions that exceed our clients’ expectations.
Water damage restoration company in Georgetown Kentucky At our company, we understand the importance of customer satisfaction. We strive to provide the highest level of service possible and take great pride in the relationships we build with our clients. Our team is available 24/7 to respond to emergencies, and we’ll work tirelessly until your property is fully restored.
Contact us today for a free estimate and let us help you get your property back to its original state. We’re here to help you through every step of the restoration process and ensure that your property is restored back to its pre-loss condition in no time.
Water damage cleanup is a crucial process that homeowners and business owners should know about. Water damage can occur in a variety of ways, such as burst pipes, leaking roofs, flooding, and even heavy rain. Whatever the cause may be, it is essential to act fast and get professional help to restore your property.
Water damage restoration is the process of removing water and moisture from your property, cleaning and repairing any damage, and restoring your property to its pre-loss condition. Water damage cleanup is the first step in the restoration process, and it involves the following steps:

Water Damage Restoration Company In Georgetown Kentucky 1. Assessment: The first step in water damage cleanup is to assess the extent of the damage. A professional restoration company will conduct a thorough inspection of the affected area to determine the type and severity of the damage. The assessment will help determine the best course of action to take.
2. Water removal: The next step is to remove any standing water from the affected area. The restoration company will use specialized equipment, such as pumps, to remove the water quickly and efficiently. It is crucial to remove the water as soon as possible to prevent further damage.
3. Drying: After the water is removed, the restoration company will use dehumidifiers and air movers to dry the affected area. The drying process can take several days, depending on the extent of the damage. It is essential to ensure that the area is completely dry before proceeding with any repairs.
4. Cleaning and sanitizing: Once the area is dry, the restoration company will clean and sanitize the affected area to prevent mold growth and eliminate any potential health hazards. They will use specialized cleaning solutions to remove any contaminants and restore the area to its pre-loss condition.
5. Restoration: The final step in water damage cleanup is to restore the property to its pre-loss condition. This may involve repairing or replacing damaged materials, such as drywall, flooring, or insulation. The restoration company will work with you to determine the best course of action to take and ensure that the restoration process is completed as quickly and efficiently as possible.
Water damage cleanup is not something that homeowners and business owners should attempt to do on their own. It is a complex process that requires specialized equipment and expertise. Hiring a professional restoration company is the best way to ensure that your property is restored to its pre-loss condition and that any potential health hazards are eliminated.
In conclusion, water damage cleanup is an essential step in the water damage restoration process. If you experience water damage in your home or business, it is crucial to act quickly and get professional help. A professional restoration company can help you assess the damage, remove any standing water, dry the affected area, clean and sanitize the area, and restore your property to its pre-loss condition.
Looking for a trusted, IICRC certified water and fire damage restoration company in Central Kentucky? Look no further than Property Damage Solutions LLC! Our family-owned and operated business has been serving the area for years, providing top-notch restoration services.

Our team of experts is IICRC certified, meaning they have the knowledge and training to handle any restoration project. From water extraction and drying to smoke and soot removal, we have the tools and expertise to handle it all.
At Property Damage Solutions LLC, we’re committed to providing excellent customer service and using the latest technology to ensure that your property is restored to its pre-damage condition. As a family-owned business, we understand the importance of treating our clients like family. You can count on us to be there for you every step of the way.
Don’t let water or fire damage get you down. Contact Property Damage Solutions LLC today for fast, reliable restoration services. We’re the best choice for IICRC certified restoration in Central Kentucky!
-
How to repair drywall
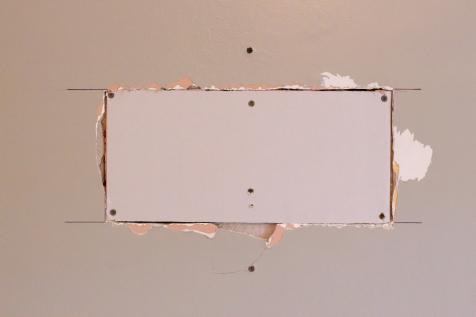
Drywall is a common building material used for walls and ceilings in many homes. It is relatively easy to install and provides a smooth surface for painting or wallpapering. However, it can be easily damaged, leading to unsightly cracks, holes, and dents. Fortunately, repairing drywall is a simple DIY project that can be completed in just a few steps. Here is a step-by-step guide on how to repair drywall, optimized for search engines.

Repairing drywall Step 1: Assess the Damage
The first step in repairing drywall is to assess the damage. Determine the size and severity of the hole or crack. If it is a small hole, less than 1 inch in diameter, it can be repaired using spackle or joint compound. If it is a larger hole, up to 6 inches in diameter, a self-adhesive mesh patch will be needed. For holes larger than 6 inches, a patch made from drywall and joint compound will be necessary.
Step 2: Gather Materials
Before beginning the repair, gather all the necessary materials. For small holes, you will need spackle or joint compound, a putty knife, sandpaper, and paint. For larger holes, you will need a self-adhesive mesh patch, a drywall saw, a utility knife, joint compound, a putty knife, sandpaper, and paint.
Step 3: Prepare the Surface
Clean the area around the hole or crack with a damp cloth, removing any loose or flaking material. If necessary, use a drywall saw or utility knife to cut away any loose or damaged drywall. For larger holes, cut a square or rectangular hole around the damaged area.
Patching drywall Step 4: Apply the Patching Material
For small holes, apply spackle or joint compound to the hole with a putty knife. Smooth it out and let it dry completely. For larger holes, apply the self-adhesive mesh patch to the hole, making sure to overlap the edges of the patch with the drywall. Cover the patch with joint compound, using a putty knife to smooth it out. Let it dry completely.
Step 5: Sand and Paint
Once the patching material is dry, sand it smooth with sandpaper. If necessary, apply a second coat of joint compound and sand again. Once the surface is smooth, it is ready for painting. Paint the repaired area to match the surrounding wall or ceiling.

Drywall repair Conclusion
Repairing drywall is a simple DIY project that can be completed in just a few steps. Assess the damage, gather materials, prepare the surface, apply the patching material, and sand and paint. With these steps, your drywall will look as good as new in no time.
-
How to install carpet; A step by step guide
How to install carpet; A step by step guide
Installing carpet is a great way to update the look of your home while also providing a comfortable and cozy feel. While it can seem intimidating, installing carpet is a relatively straightforward process that can be completed in a few hours. In this article, we’ll provide a step-by-step guide on how to install carpet in your home.
Carpet installation Step 1: Measure the Room
Before you begin installing carpet, you’ll need to measure the room to determine how much carpet you’ll need. Measure the length and width of the room and multiply the two measurements together to get the square footage. Add 10% to this number to account for any waste.
Step 2: Gather Materials
You’ll need the following materials to install carpet: carpet, padding, tack strips, a carpet knife, a knee kicker, a power stretcher, a staple gun, and a seam iron.
Step 3: Prepare the Room
Remove all furniture from the room and ensure that the subfloor is clean and free of debris. If you’re installing carpet over a concrete floor, you’ll need to seal any cracks and allow the sealer to dry.
Step 4: Install the Tack Strips
Tack strips are thin strips of wood with small, sharp nails that grip the carpet and hold it in place. Begin by placing the tack strips around the perimeter of the room, leaving a small gap between the strip and the wall.
Step 5: Install the Padding
Roll out the padding across the entire floor, making sure it covers the tack strips. Trim any excess padding with a carpet knife and staple the padding to the subfloor every six inches along the edges and in the center of the room.
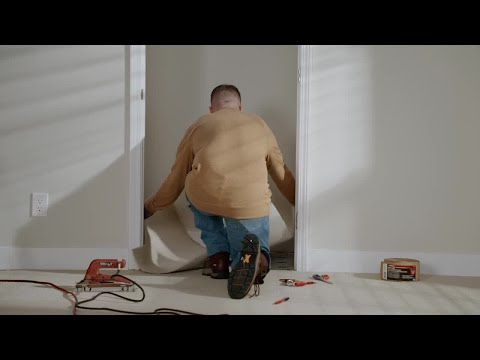
Step 6: Install the Carpet
Roll out the carpet and align it with the walls, leaving a few inches of excess on each side. Use a knee kicker to attach the carpet to the tack strips along one wall, then use a power stretcher to stretch the carpet across the room and attach it to the tack strips on the opposite wall.
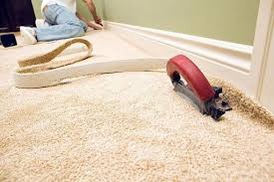
Seaming carpet Step 7: Trim and Seam the Carpet
Trim any excess carpet along the edges of the room using a carpet knife, then use a seam iron to heat and join any seams in the carpet.
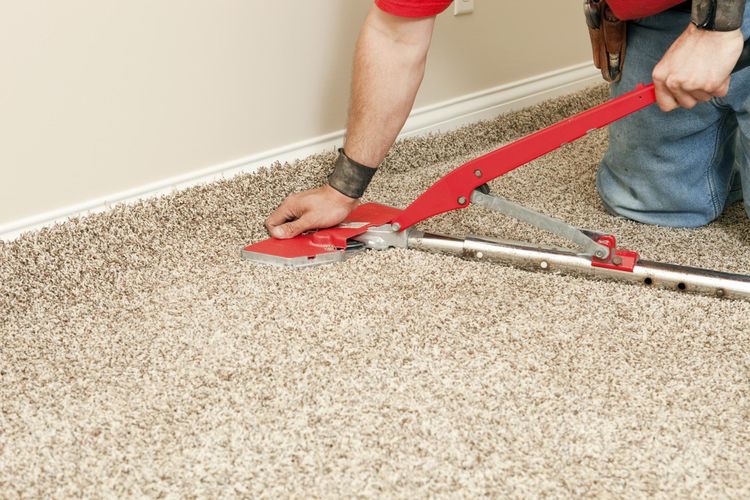
Stretching carpet Step 8: Finish the Installation
Trim any excess padding that may be sticking out from under the carpet with a carpet knife. Then, trim the carpet along the walls and tack it down with a carpet tucker. Finally, vacuum the carpet to remove any debris.
Conclusion:
Installing carpet can be a DIY project that can save you money while also updating the look and feel of your home. By following these steps, you can have a professionally installed carpet in your home in just a few hours.

Dont Let Water Damage Destroy Your House
Call For An Inspection: (859)302-2702
We Servere:
Lexington, Kentucky
Richmond,Kentucky
Newby,Kentucky
Nicholasvillle,Kentucky
Georgetown, Kentucky
Winchester, Kentucky
Follow Me On
Subscribe To My Newsletter
Subscribe for new travel stories and exclusive content.
