-
cigarette smoke odor removal, fire damage restoration, lexington, kentucky, mold inspection company, mold removal service, smoke odor removal, Water Damage, water damage cleanup, water damage cleanup company, water damage mitigation, water damage mitigation company, water damage restoration, water removal service near me, water restoration company
7 Hidden Signs of Water Damage in Your Home or Business
Serving All Of Central Kentucky


We are an IICRC Water Damage Restoration Master Restorers

Book Now

We Are Also IICRC Certified Master Fire Damage Restorers Click To Book
24 HR Water Removal Services Click To Call
-
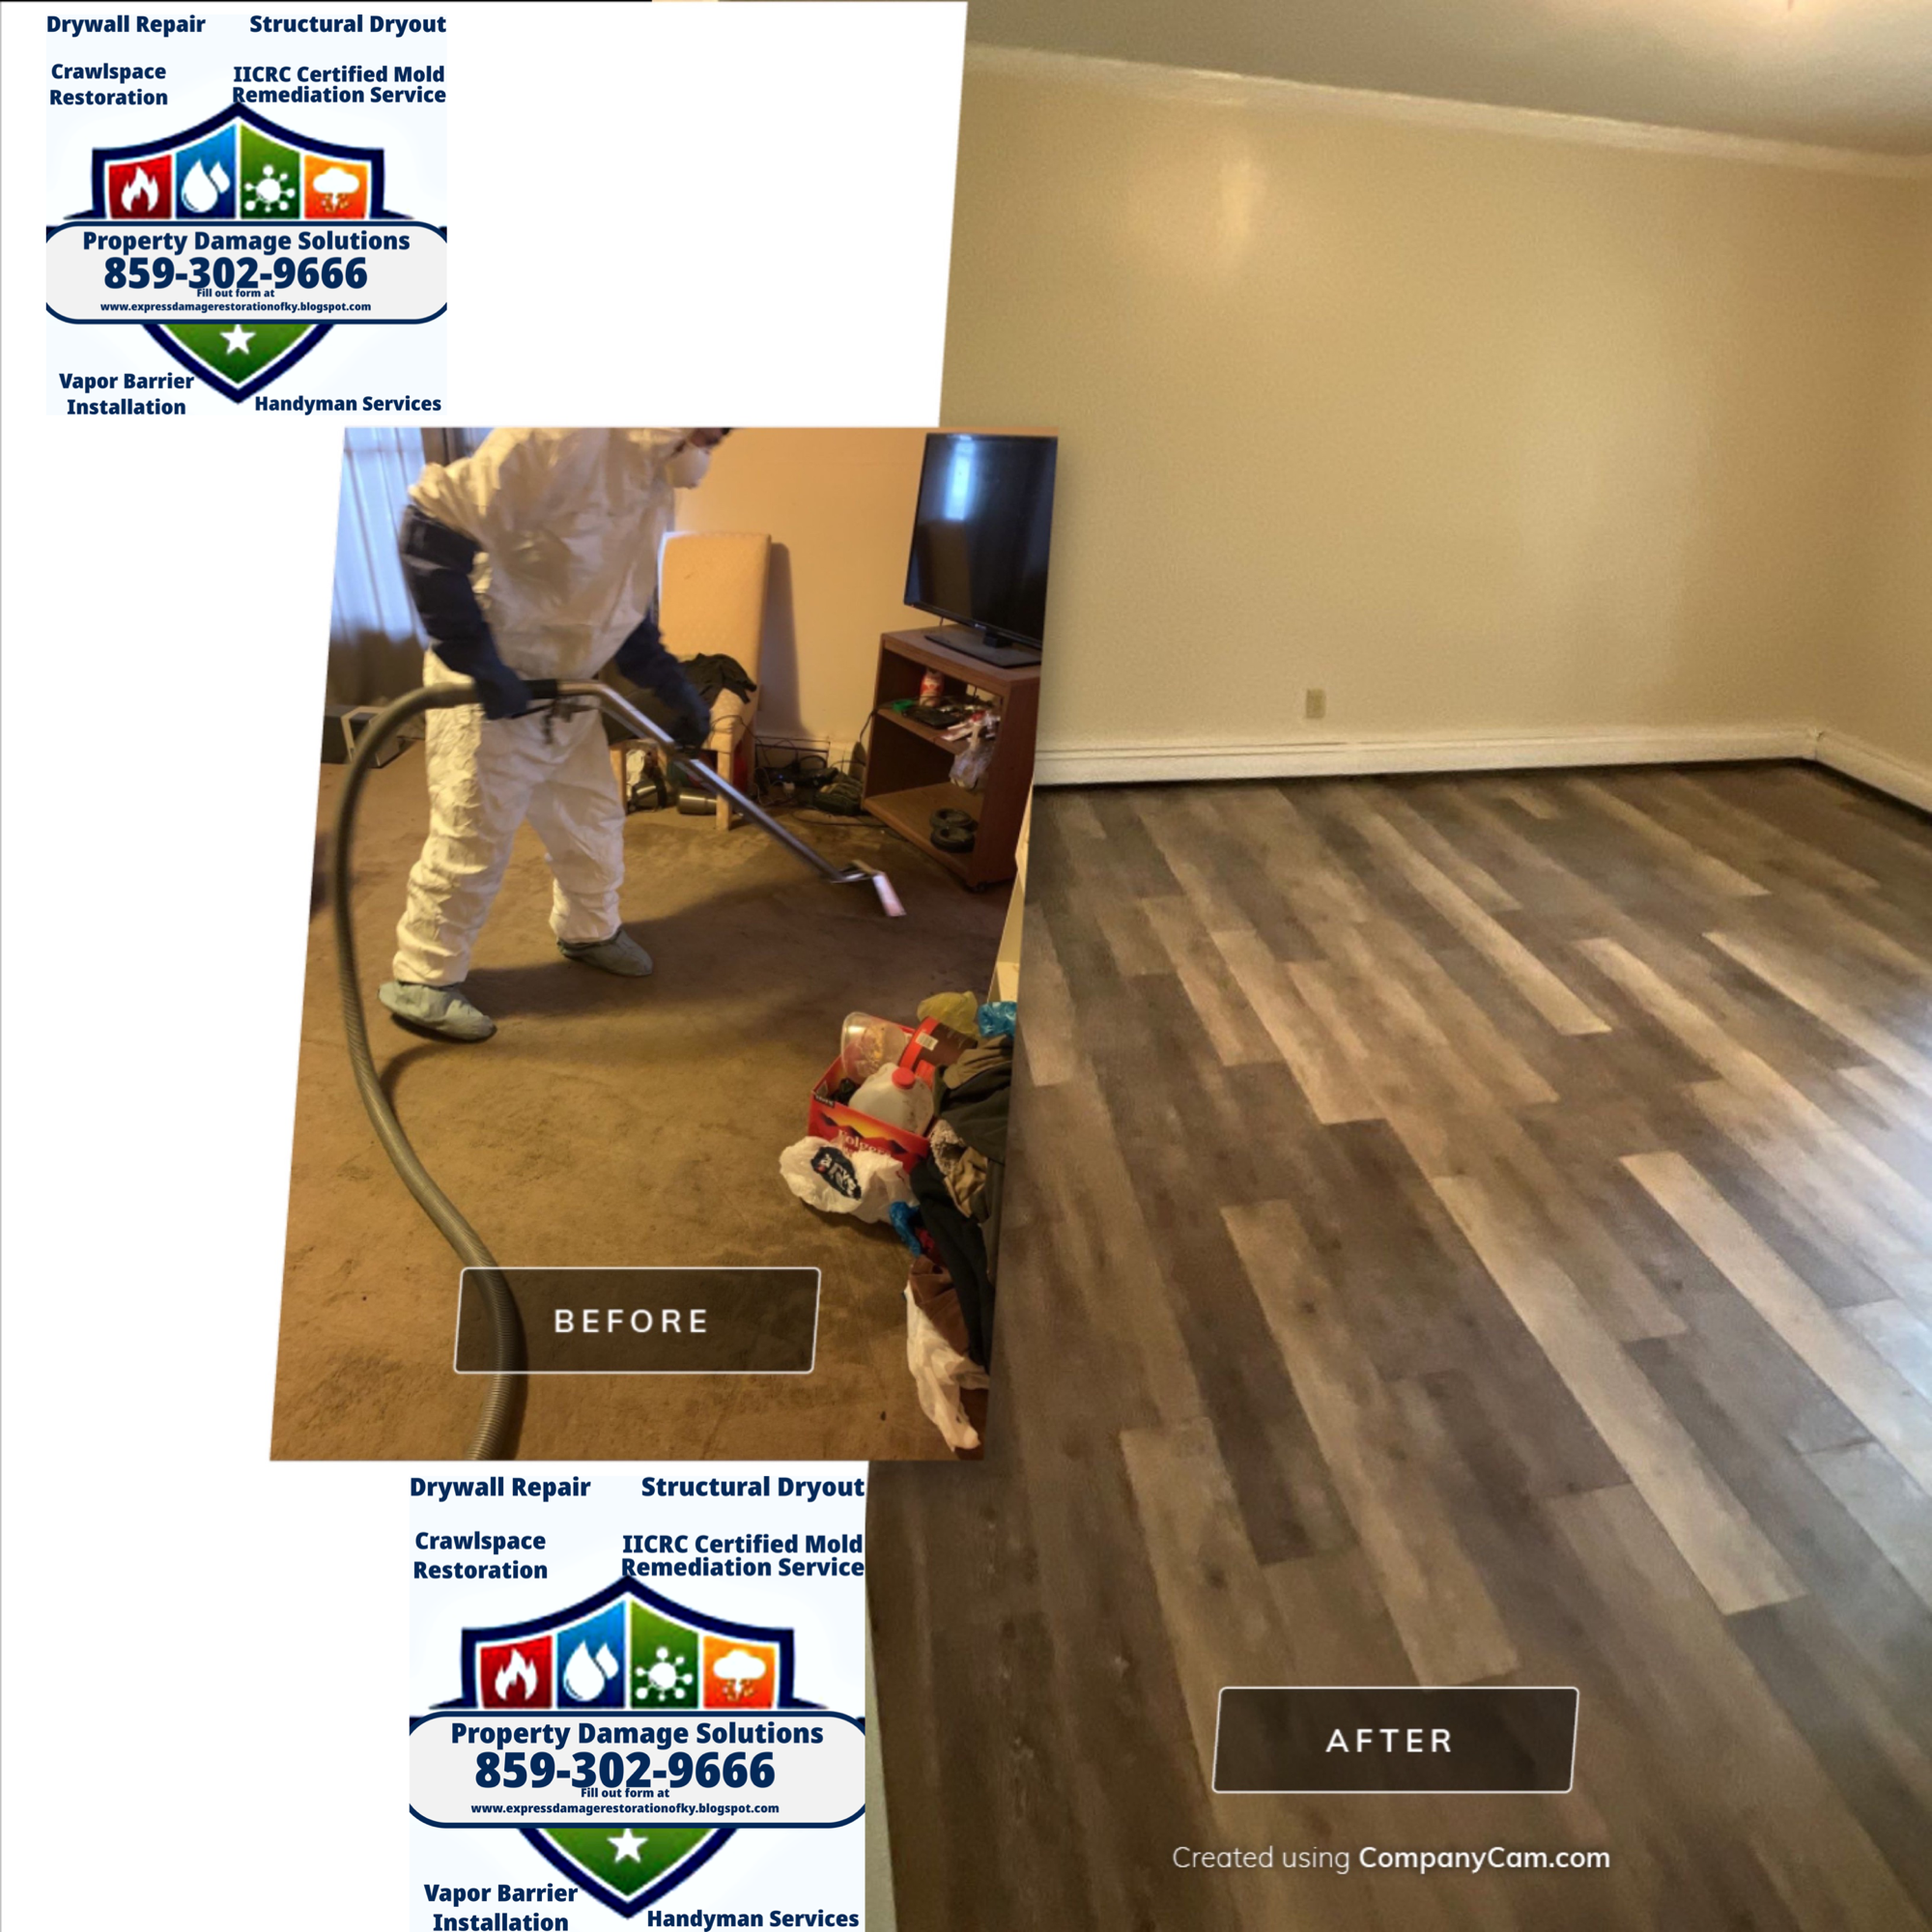
The Importance of Exterior and Interior Waterproofing

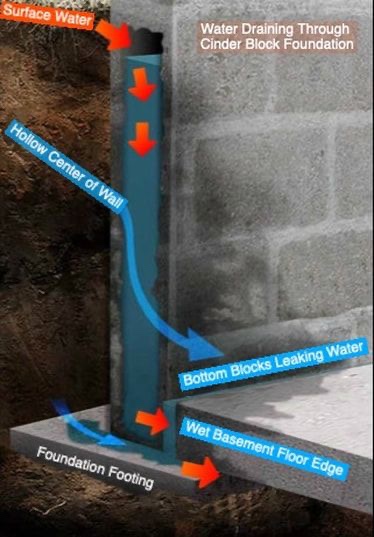
This basement was below grade, the waterproofing product used to seal the exterior when constructed, had degraded and delaminated over time. The Importance of Exterior and Interior Waterproofing
Waterproofing is an essential aspect of maintaining the structural integrity and longevity of any property. Whether it’s a residential home, a commercial building, or an industrial facility, ensuring that both the exterior and interior are well-protected from water damage can save you significant time, money, and stress in the long run. Here’s why you might need exterior or interior waterproofing and how it can benefit your property.
Understanding Exterior Waterproofing
Exterior waterproofing focuses on protecting the outer structure of a building from water infiltration. This type of waterproofing is crucial for several reasons:
- Preventing Structural Damage: Water seepage can weaken the foundation, leading to cracks and structural instability. Exterior waterproofing helps keep water away from the foundation, preserving its strength and durability.
- Mold and Mildew Prevention: Moisture can create an ideal environment for mold and mildew growth, which can cause health issues and damage building materials. Exterior waterproofing reduces the risk of mold and mildew by keeping water out.
- Enhancing Property Value: A well-maintained, waterproofed exterior can increase your property’s market value. Potential buyers are likely to pay more for a home or building that doesn’t have water damage issues.
- Energy Efficiency: Waterproofing can also improve your property’s energy efficiency. Proper insulation and waterproofing can help maintain indoor temperatures, reducing the load on heating and cooling systems.
The Role of Interior Waterproofing

Annual inspections are needed to maintain waterproofing efforts all of our waterproofing installations come with regular maintenance and inspections Interior waterproofing is equally important and serves as an additional line of defense against water intrusion. Here’s why you might need interior waterproofing:
- Basement Protection: Basements are particularly susceptible to water infiltration. Interior waterproofing helps keep basements dry, preventing damage to personal belongings and reducing the risk of mold growth.
- Mitigating Existing Water Problems: If your property already has water issues, interior waterproofing can help manage and reduce the impact. This approach includes installing sump pumps, interior drainage systems, and waterproof coatings.
- Health and Safety: A dry interior environment is crucial for maintaining good indoor air quality. Waterproofing helps prevent mold and mildew, which can cause respiratory problems and other health issues.
- Longevity of Building Materials: Water damage can cause significant wear and tear on building materials. Interior waterproofing protects walls, floors, and other structures from moisture, prolonging their lifespan.
Choosing the Right Waterproofing Solution
Determining whether you need exterior or interior waterproofing—or both—depends on your specific situation. Here are some factors to consider:
- Climate and Weather Conditions: Properties in areas with high rainfall or prone to flooding may benefit more from exterior waterproofing.
- Age and Condition of the Property: Older properties with existing water damage may require comprehensive interior waterproofing solutions.
- Budget and Resources: While exterior waterproofing is typically more expensive, it offers long-term benefits. Interior waterproofing can be a cost-effective solution for managing current issues.
Professional Waterproofing Services
IICRC Water-Mold-Smoke-Fire Damage Certified Professionals Call ☎️ 859-267-3482 At Property Damage Solutions, we specialize in both exterior and interior waterproofing services. Our team of experts can assess your property, identify potential water intrusion points, and recommend the best solutions to protect your investment.
Conclusion
Waterproofing is not just an optional upgrade; it’s a necessary step to protect your property from the damaging effects of water. Whether you need to safeguard the exterior, manage existing interior issues, or both, professional waterproofing services can help you maintain a safe, dry, and valuable property. Contact us today to learn more about our comprehensive waterproofing solutions and how we can help you achieve peace of mind and long-term property protection.
For more information, visit Property Damage Solutions or give us a call at 859-302-9666. Let us help you keep your property safe from water damage.
-
Understanding Whiskey Fungus: Causes, Effects, and Prevention

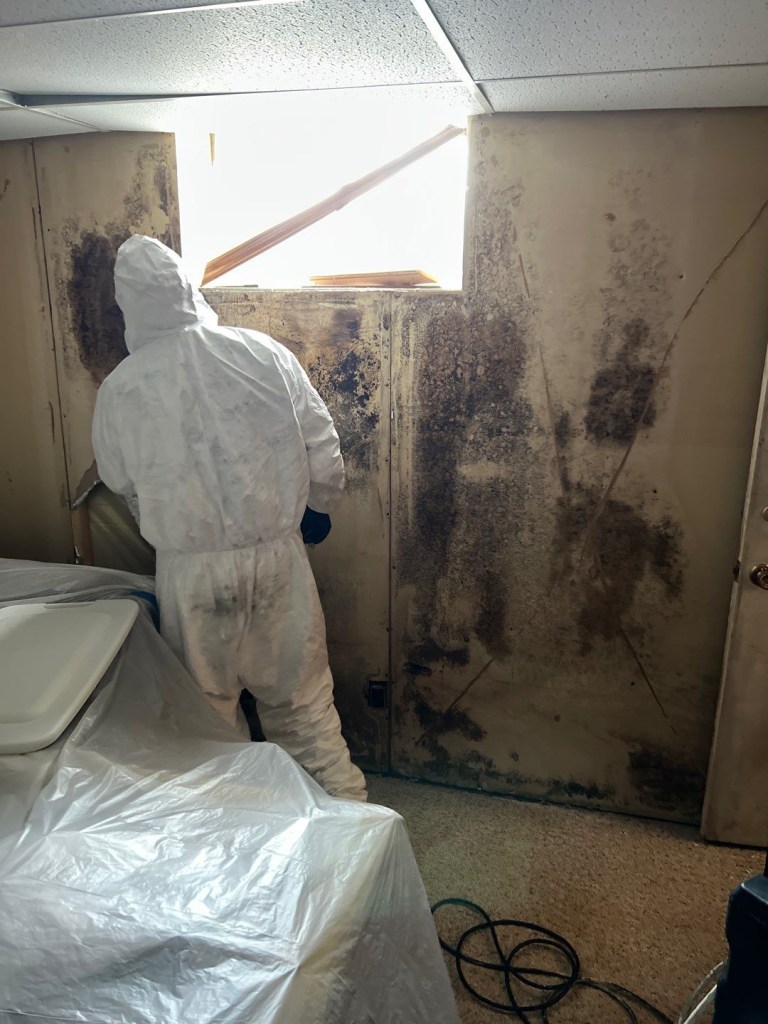
Whiskey Fungus Is A Black Mold Whiskey fungus, also known as Baudoinia compniacensis, is a type of black mold that commonly grows on buildings and structures near whiskey distilleries and other facilities where ethanol is produced. While whiskey fungus itself does not pose significant health risks to humans, it can cause aesthetic and structural damage to buildings and outdoor surfaces. In this article, we’ll explore the causes, effects, and prevention measures for whiskey fungus.
Causes of Whiskey Fungus:
Whiskey fungus thrives in environments with high levels of ethanol vapor, which are typically found near distilleries, breweries, and other industrial facilities where alcohol is produced. The fungus feeds on the ethanol vapors released during the fermentation and aging processes, as well as on other organic compounds present in the air.

Houses Near Distilleries Commonly Need Pressure Washed And Treated Effects of Whiskey Fungus:
- Aesthetic Damage: The most noticeable effect of whiskey fungus is the black staining it creates on outdoor surfaces such as buildings, fences, and trees. These unsightly stains can detract from the appearance of properties and structures, leading to concerns among property owners and communities.
- Structural Damage: In addition to aesthetic concerns, whiskey fungus can also cause structural damage to buildings and other surfaces over time. The fungus can penetrate and degrade certain types of building materials, including wood, concrete, and metal, potentially compromising their integrity and longevity.
- Environmental Impact: Whiskey fungus releases spores into the air, which can spread and settle on nearby vegetation, soil, and water bodies. While the impact of whiskey fungus on the environment is relatively minimal compared to other types of pollution, it can still contribute to ecological changes in affected areas.

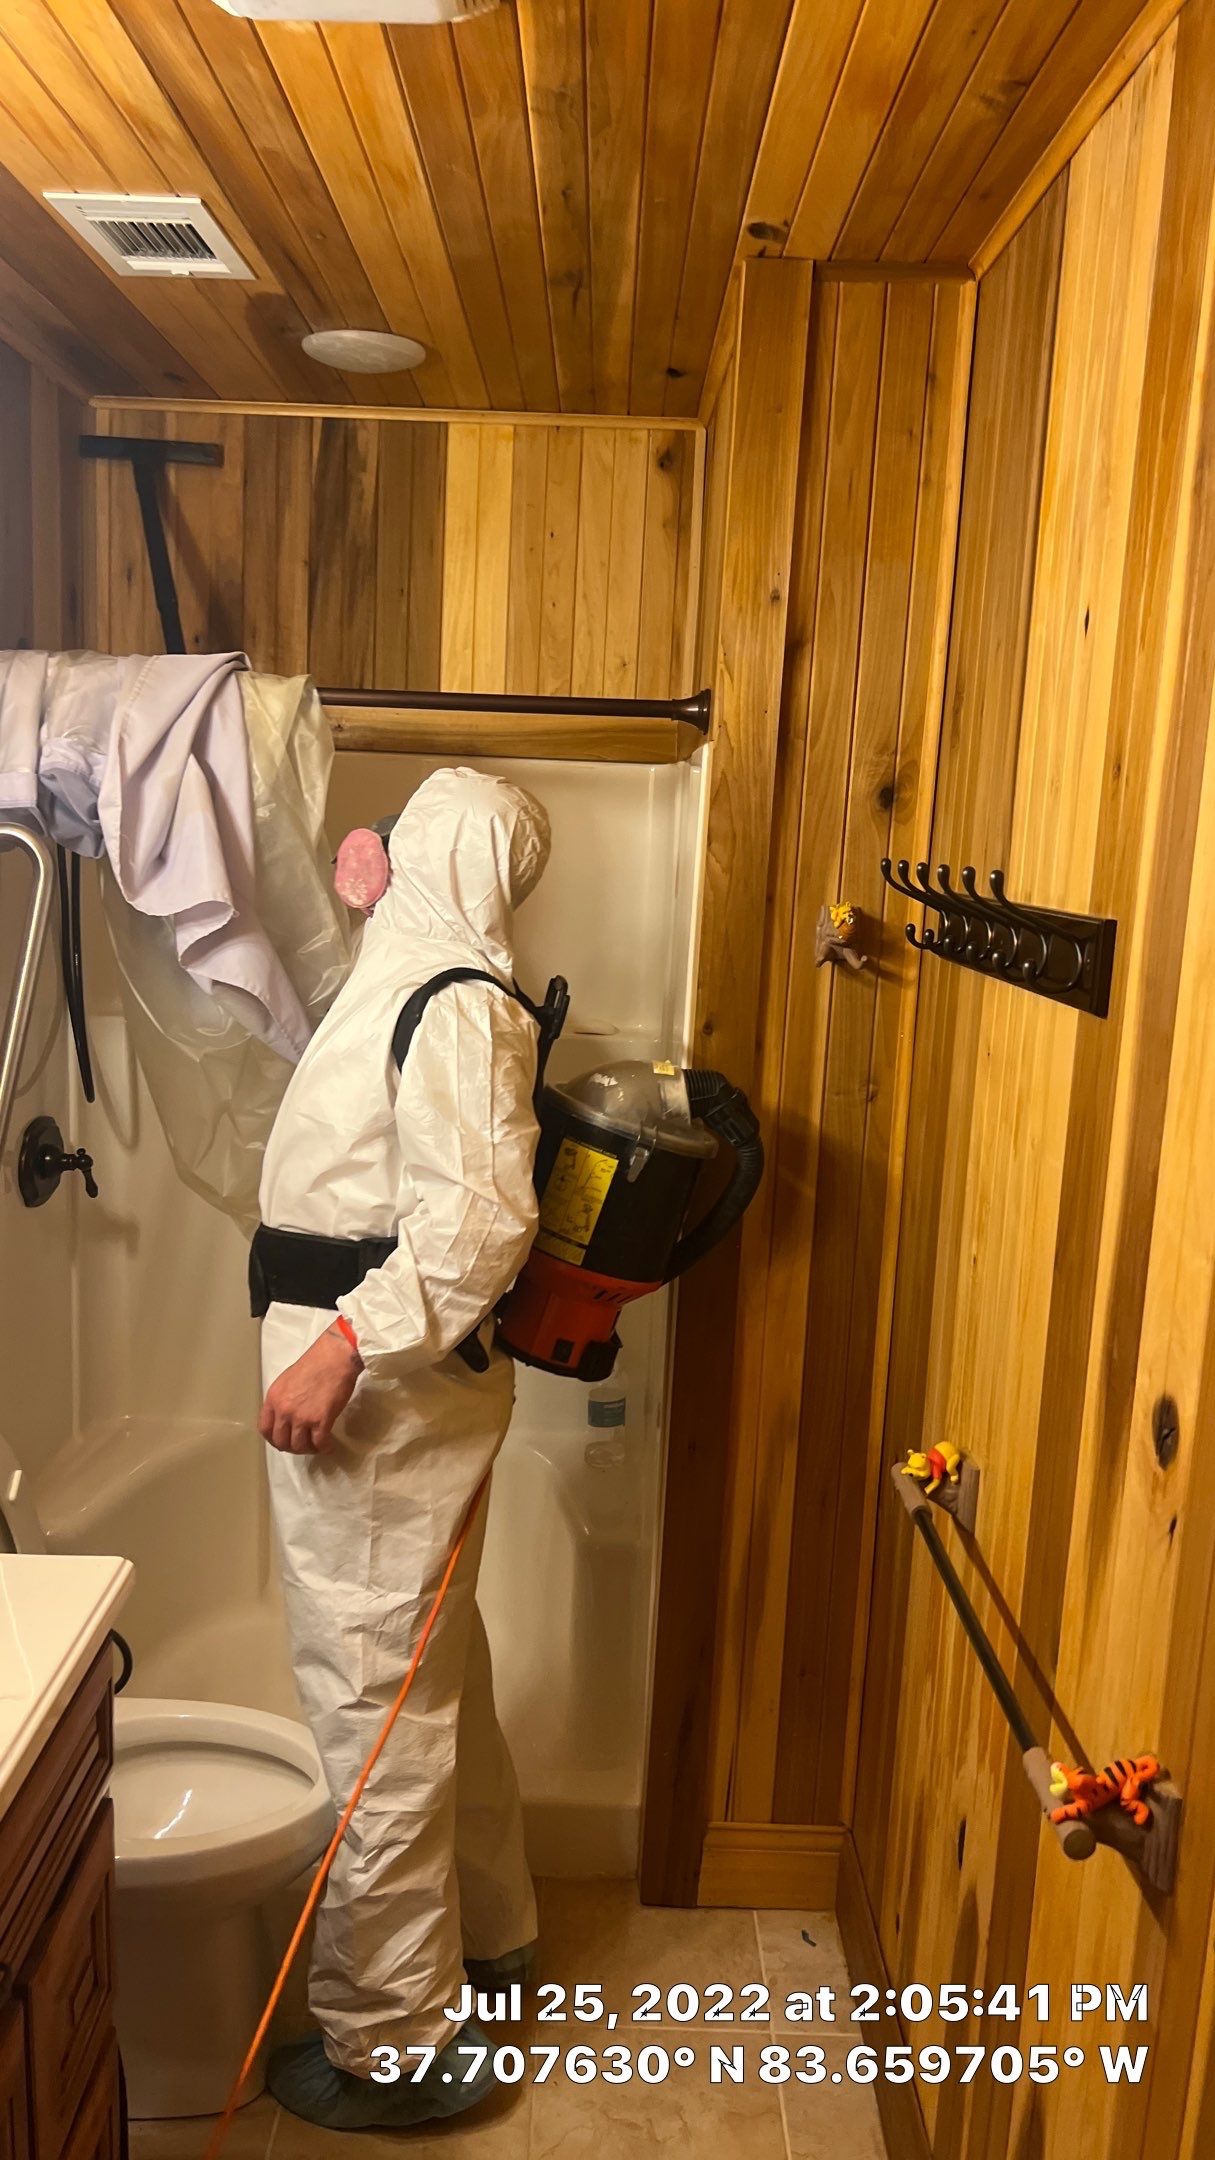
We use a plant based anti microbial in our monthly treatments for clients as well as thorough inspections to the most vulnerable areas of the home. These monthly treatments are for any microbes as well as whiskey fungus. Prevention of Whiskey Fungus:
- Site Selection: When planning the location of a distillery or industrial facility, consider the surrounding environment and potential impacts on nearby properties. Choose sites with adequate distance from residential areas and sensitive ecosystems to minimize the risk of whiskey fungus growth.
- Emissions Control: Implement measures to control and reduce emissions of ethanol vapors and other organic compounds from production processes. This may include installing vapor recovery systems, improving ventilation, and optimizing fermentation and aging techniques to minimize emissions.
- Surface Treatments: Apply protective coatings or sealants to outdoor surfaces to create a barrier against whiskey fungus growth. These treatments can help prevent the fungus from establishing a foothold and make it easier to clean and remove any staining that does occur.
- Regular Maintenance: Implement a regular maintenance schedule to inspect and clean outdoor surfaces for signs of whiskey fungus growth. Promptly remove any black stains using appropriate cleaning methods and products to prevent further spread and damage.
- Community Engagement: Foster open communication and collaboration with local communities and stakeholders to address concerns related to whiskey fungus. Educate residents and property owners about the causes and effects of the fungus and involve them in discussions about prevention and mitigation strategies.
Conclusion:
Whiskey fungus may not pose a direct health risk to humans, but its presence can have significant aesthetic and structural impacts on buildings and outdoor surfaces near distilleries and industrial facilities. By understanding the causes of whiskey fungus and implementing proactive prevention measures, we can minimize its effects and preserve the integrity and beauty of our communities.
For professional assistance with whiskey fungus removal and prevention, contact Property Damage Solutions at (859) 302-9666 or email propertydamage123@gmail.com.
We Are IICRC Certified Mold Removal Specialists Call, Text, Email, we do emergency water extraction 24/7/365
-

Emergency Water Extraction from Basements and Crawlspaces in Richmond, Kentucky
Emergency Water Extraction from Basements and Crawlspaces in Richmond, Kentucky
When disaster strikes, swift action is crucial to minimize damage and restore normalcy. At Property Damage Solutions, we specialize in emergency water extraction services for basements and crawlspaces in Richmond, Kentucky, and surrounding areas of central Kentucky. With our prompt response and expertise, we’ll help you mitigate water damage effectively, ensuring your property is restored to its pre-loss condition.
Expert Water Extraction Services
Our team of skilled professionals is equipped with state-of-the-art equipment and industry-leading techniques to tackle water emergencies of any scale. Whether it’s a burst pipe, flooding, or any other water-related catastrophe, we’re here to provide swift and efficient water extraction services.
Comprehensive Assessment and Planning
Upon arrival at your property, our certified technicians will conduct a thorough assessment of the water damage. We’ll determine the extent of the damage and formulate a tailored plan to address the situation effectively. Our goal is to minimize disruption to your life and property while ensuring thorough water extraction and drying.
Advanced Equipment and Techniques
At Property Damage Solutions, we utilize advanced water extraction equipment, including powerful pumps, extractors, and dehumidifiers, to remove water quickly and efficiently. Our team is trained in the latest techniques for water removal and structural drying, ensuring that your property is dried thoroughly to prevent mold growth and structural damage.
24/7 Emergency Response
Water emergencies can happen at any time, day or night. That’s why we offer 24/7 emergency response services to our clients in Richmond, Kentucky, and the surrounding areas. You can count on us to be there when you need us the most, ready to provide immediate assistance and peace of mind.
Licensed, Bonded, and Insured
Property Damage Solutions is a licensed, bonded, and insured water damage restoration company. We adhere to the highest industry standards and regulations to ensure the safety and satisfaction of our clients. With us, you can rest assured that your property is in capable hands.
Contact Us Today
 Call ☎️ 859-302-9666
Don’t let water damage wreak havoc on your property. If you’re facing a water emergency in your basement or crawlspace, don’t hesitate to contact Property Damage Solutions at 859-302-9666. Our team is standing by to provide prompt, professional assistance and help you restore your property to its former glory.
-
How Does A.T.P testing work

The following article explains; How Does A.T.P testing work.
ATP (Adenosine Triphosphate) testing is a method used to determine the presence of biological contamination, such as bacteria, yeast, or mold, in a sample. The test works by measuring the amount of ATP (a molecule found in all living cells) in a sample using a luminometer.

A.T.P Testing With A Luminometer Typically, the sample is mixed with a reagent called luciferin, which reacts with ATP to produce light. The amount of light produced is proportional to the amount of ATP present in the sample. The light emission is then measured by the luminometer, and the result is reported in relative light units (RLU). High RLU values indicate high levels of ATP and therefore high levels of biological contamination.
ATP testing is widely used in a variety of industries, including food safety, environmental monitoring, and healthcare, as a quick and simple way to assess the level of hygiene and cleanliness in a given area.
-
lexington, kentucky, mold damage, mold inspection company, mold remediation, mold removal, richmond,Kentucky, Water Damage, water damage cleanup, water damage cleanup company, water damage mitigation, water damage mitigation company, water damage restoration, water removal service near me, water restoration company
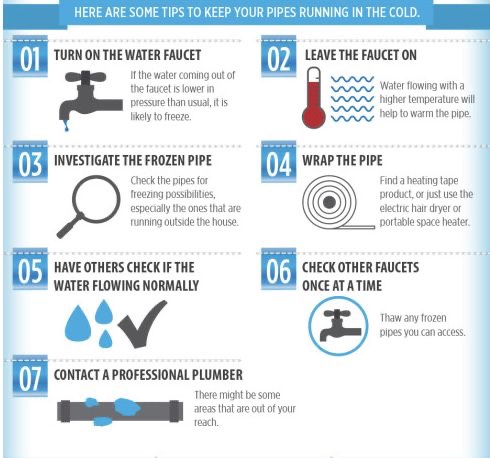
How to thaw frozen pipes

For emergency water removal call ☎️ (859)302-2702
Old man winter is unbearable as it is, water damage from burst frozen pipes in the middle of it can be a nightmare. Should your pipes freeze, the following will give you tips on how to thaw frozen pipes.

Tips on thawing frozen water pipes to parent water damage Thawing Frozen Pipes
What to do if a pipe bursts
https://www.lex18.com/news/unprecedented-number-of-water-pipes-break-in-lexington?_amp=true
If a pipe bursts in your home, you’ll need to act fast to mitigate additional damage. Shut off your water as quickly as possible. This will help minimize the amount of water that seeps out inside your walls. You may also want to shut off power in the affected area of your home. After you’ve taken these precautionary steps, it’s time to call a plumber and start mopping up any mess that’s been caused. Try to remove as much of the water and lingering moisture as you can to avoid mold and mildew buildup. Depending on the severity of your case, you may also need to bring in other professionals to address damage to your walls, carpet, flooring or ceiling.
Shit water off to prevent water damage in case a pipe bursts How to thaw out pipes
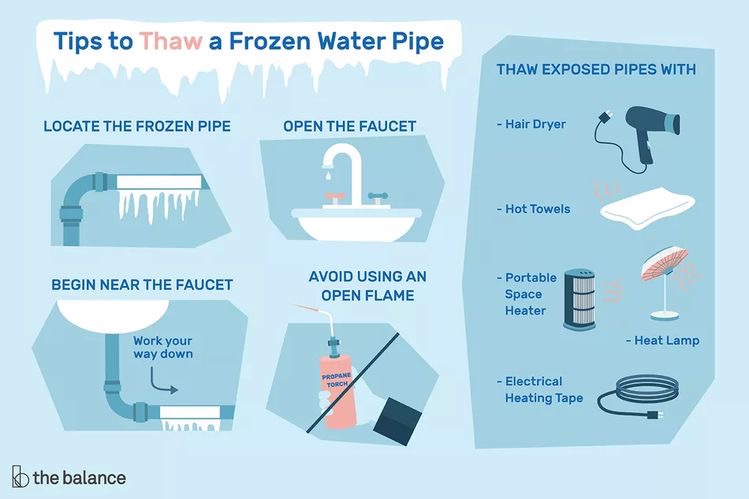
How can you tell if your pipes are frozen? If you turn on the bathroom or kitchen faucet and see only a few drops or a trickle of water, this could indicate that water inside the pipes has frozen – preventing a free flow. But don’t panic. You may be more equipped to deal with the situation than you think. Here’s a quick lesson on how to thaw a frozen pipe.
Step 1. Turn on the faucet
Keep it running. Allowing the faucet to drip even slightly can help prevent a pipe from bursting. It’s simple – when freezing takes place, extreme pressure builds between the faucet and the ice blockage. An open faucet relieves this pressure buildup, in turn preventing a burst from occurring.
Step 2. Apply heat to the frozen area, thermal energy promotes drying.
Slowly apply heat using a hair dryer. There are several ways to do this. You can wrap the pipes in thermostatically controlled heat tape, or you can use an external heat source such as a hair dryer or space heater. Do not use a propane torch as this can damage the pipe and present a fire risk.
If you decide to use a hair dryer, begin directing air close to the faucet end of the pipe and gradually move toward the coldest section. Be careful not to overheat the hair dryer or blow a fuse. Remember, the faucet should be left on while heat is being applied.
Step 3. Continue to apply heat
Don’t stop heating until full water pressure is restored. Even then, it’s a good idea to leave the faucet open for a few minutes after the pipe is thawed. This will give the ice time to completely clear from the line.
Ways to thaw frozen pipes Step 4. Check all faucets and prevent pipes from freezing in the future
Check each faucet in your home for any other frozen pipes. One frozen pipe may mean that others have been affected as well.
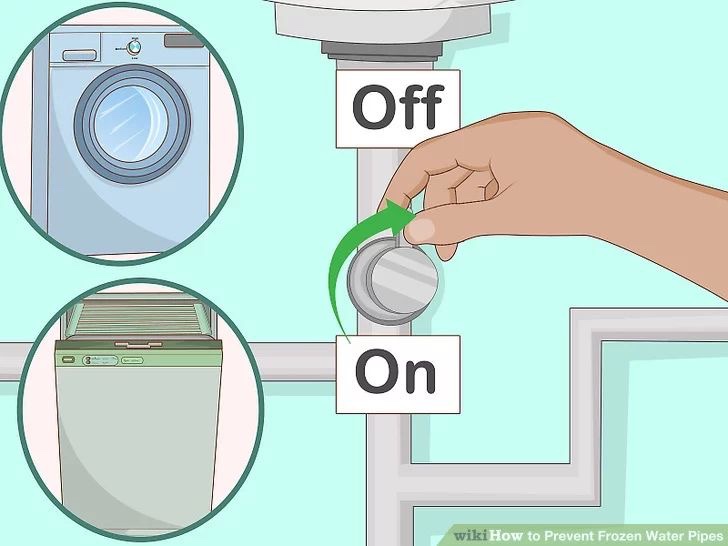
If the problem persists, contact a plumber. You can prevent pipes from freezing again by taking a few simple steps:
Before traveling, keep the temperature in your home above freezing and turn off all the water to your house.
Be sure to keep all water pipes, especially those close to outside walls, insulated with foam rubber or heating cable.
Keep cabinet doors open to allow air to circulate.
Let your faucets drip cold water – it is harder for a pipe to freeze even if there is a trickle of water flowing through. In order to not waste water, you can collect the drops and reuse it, possibly for cleaning or watering plants.
How long does it take for pipes to unfreeze?
Using any of the handful of methods on how to thaw frozen pipes will typically take about 30 minutes. This can vary depending on the weather, how long the pipe has been frozen and where the pipe is located. Any of these factors can cause the thawing process to take longer.2
And remember, a frozen pipe isn’t the only issue that comes with cold weather. Find out other ways to protect your home during the winter.
Ways to prevent frozen pipes Quick tip on drying if you have a pipe burst, find out the GPP (grains per pound) inside your home and then outside, you can do this by purchasing a thermometer hydrometer. If the gpp is lower outside than inside, then you can dry your home with what is known in the water damage restoration industry as “an open drying system. Click to check out our mold damage prevention tips there is more tips on how to dry a house out after water damage without water damage restoration equipment.
-
Fire Damage Restoration Company
Fire Damage Restoration Company
Fire damage can be a devastating experience for any homeowner or business owner. Not only does it cause physical damage to the structure of the property, but it can also result in emotional distress and financial burden. However, there is hope in the form of fire damage restoration companies. These companies specialize in restoring properties that have been affected by fire, smoke, and water damage.
Fire damage restoration companies are equipped with the tools, knowledge, and experience to restore your property to its pre-loss condition. They will work with you and your insurance company to develop a restoration plan that meets your specific needs and budget. The process of fire damage restoration typically involves the following steps:
Assessment and Inspection:
The first step in fire damage restoration is assessing the extent of the damage. A team of professionals will inspect the property to determine the scope of the damage and develop a plan for restoration.
Damage Mitigation:
Once the assessment is complete, the restoration team will work to mitigate any further damage to the property. This may involve boarding up windows, tarping the roof, and removing any debris or hazardous materials.Water Removal:
Firefighters often use water to extinguish flames, which can result in water damage to the property. Fire damage restoration companies use specialized equipment to remove standing water and dry out the affected areas to prevent further damage.Smoke and Soot Removal:
Smoke and soot can cause extensive damage to a property, including discoloration, staining, and odor. Fire damage restoration companies use specialized techniques and equipment to remove smoke and soot from the property, including air scrubbers and ozone machines.Restoration and Reconstruction:
Finally, the restoration team will begin the process of restoring the property to its pre-loss condition. This may involve repairing or replacing damaged walls, floors, and ceilings, as well as painting and installing new fixtures and appliances.When choosing a fire damage restoration company, it is important to choose a company that is licensed, insured, and certified. Look for a company that has experience working with your insurance company and is familiar with the claims process. You should also look for a company that is available 24/7 and can respond quickly to your emergency.
In conclusion, fire damage can be a traumatic experience, but there is hope in the form of fire damage restoration companies. These companies are equipped with the tools, knowledge, and experience to restore your property to its pre-loss condition. If you are in need of fire damage restoration services, don’t hesitate to contact a reputable company today.
-
What Is An IICRC Certified Company
An IICRC Certified Firm is a company that has been certified by the Institute of Inspection, Cleaning and Restoration Certification (IICRC). This certification is a globally recognized standard for the cleaning, restoration and inspection industries.
IICRC Certified Fire 🔥 Damage Restoration Company To become an IICRC Certified Firm, a company must meet specific requirements related to training, insurance, and ethics. These requirements are designed to ensure that the company has the necessary knowledge and skills to provide high-quality services to their customers.
IICRC Certified Firms are required to follow a strict code of ethics and are held to high standards of professionalism and quality. They must also maintain ongoing training and education to keep up with the latest techniques and technologies in the industry.

When you hire an IICRC Certified Firm, you can be confident that you are working with a company that is committed to providing the highest level of service and quality. Whether you need help with fire damage restoration, water damage restoration, or mold remediation, an IICRC Certified Firm has the knowledge and expertise to get the job done right.
-
How To Keep Water Out Of Your Basement

French Drain There are several options you can consider to keep water out of your basement:
- Install a sump pump: A sump pump is a device that pumps water out of your basement and away from your home. It is installed in a sump pit in your basement and automatically turns on when the water level rises.
- Improve your gutters and downspouts: Make sure your gutters and downspouts are clean and free of debris. Consider installing gutter guards to prevent leaves and other debris from clogging the gutters. Also, make sure your downspouts extend at least 6 feet away from your home.
- Install French drains: A French drain is a trench filled with gravel or rock that is designed to redirect water away from your home. The trench is typically lined with fabric to prevent soil and debris from entering the drain.
- Waterproof your basement: There are several waterproofing techniques you can use to keep water out of your basement, such as applying waterproof coatings to the walls or installing a waterproof membrane.
- Grade your yard: Make sure the ground around your home slopes away from the foundation. This will help prevent water from pooling around your home and seeping into the basement.
A basement is an essential part of any home. It provides additional space for storage, recreation, and living. However, a wet basement can I cause significant problems, including mold growth, water damage, and structural issues. Waterproofing your basement can prevent these issues and keep your home dry and safe. In this article, we will discuss different products and methods of sealing a basement for waterproofing.
- Sealant Paints
Sealant paints are the simplest and most affordable way to waterproof your basement. These paints are specially designed to create a barrier between the walls and the moisture. They are easy to apply, and you can use them on any surface, including concrete, brick, and stone. However, sealant paints only work if the walls are free of cracks and leaks. If your basement has severe water problems, sealant paints may not be enough.
- Crystalline Waterproofing
Crystalline waterproofing is a more advanced method of sealing a basement. It involves applying a specialized chemical mixture to the walls and floors of the basement. The chemicals penetrate the surface and react with the moisture to form a crystalline structure that seals the walls and floors. Crystalline waterproofing is effective, long-lasting, and can be used in both new and existing basements.
Exterior waterproofing involves excavating the soil around the perimeter of your home and applying a waterproof coating to the outside walls. This method is more expensive and time-consuming than other methods, but it is also the most effective. Exterior waterproofing prevents water from penetrating the walls and foundation of your home, reducing the risk of water damage and mold growth.
- Interior Waterproofing
Interior waterproofing involves installing a drainage system along the perimeter of the basement walls to collect and remove water. This method is more affordable than exterior waterproofing and is ideal for basements with minor water problems. Interior waterproofing is effective in preventing water damage and mold growth, but it does not prevent water from entering the walls and foundation of your home.
Interior waterproofing is another effective method for keeping your basement dry and protecting your home from water damage. Here is a step-by-step guide on how to waterproof your basement from the inside:
Materials Needed:
- Waterproofing paint or sealant
- Paintbrush or roller
- Pressure washer
- Concrete patching compound
- Trowel
- Safety goggles
- Gloves
Step 1: Clean the basement walls Use a pressure washer to clean the basement walls thoroughly. This will remove any dirt, debris, and loose paint that may interfere with the waterproofing process. Allow the walls to dry completely before proceeding.
Step 2: Repair any cracks or holes Inspect the basement walls for any cracks or holes that may allow water to seep in. Use a concrete patching compound and a trowel to fill in any gaps and smooth the surface. Allow the compound to dry completely before proceeding.
Step 3: Apply waterproofing paint or sealant Choose a waterproofing paint or sealant that is suitable for your basement walls. Apply the first coat using a paintbrush or roller, making sure to cover the entire wall. Allow the first coat to dry completely before applying the second coat. Some waterproofing paints or sealants may require a third coat, so check the manufacturer’s instructions.
Step 4: Inspect the walls for any missed spots Inspect the walls carefully for any spots that may have been missed during the application of the waterproofing paint or sealant. Apply another coat of paint or sealant to these spots, and allow it to dry completely.
Step 5: Maintain the waterproofing After the waterproofing is complete, it is important to maintain it to ensure its effectiveness. This includes fixing any leaks, cracks, or holes as soon as they appear, and inspecting the walls periodically for any signs of water damage. Additionally, it is important to keep the basement well-ventilated and dry to prevent the growth of mold and mildew.
In conclusion, interior waterproofing is a cost-effective and efficient method for keeping your basement dry and protected from water damage. By following these simple steps, you can ensure that your basement walls are properly sealed and waterproofed. If you are unsure about performing the waterproofing yourself, it is best to hire a professional contractor who specializes in basement waterproofing.
- Sump Pump Installation
A sump pump is a device that collects water from the basement and pumps it away from your home. It is a crucial component of any waterproofing system and is typically used in conjunction with interior waterproofing. Sump pumps are available in different sizes and capacities, and you can choose one that suits your needs.
In conclusion, there are different products and methods of sealing a basement for waterproofing, depending on your needs and budget. Sealant paints, crystalline waterproofing, exterior waterproofing, interior waterproofing, and sump pump installation are some of the most popular methods. If you are unsure which method to choose, consult with a professional waterproofing contractor to determine the best solution for your home.
It’s important to note that the best solution for keeping water out of your basement will depend on the specific conditions of your home and the source of the water. It’s always a good idea to consult with a professional to determine the best course of action. Heres one way.
Sump pump installation is a crucial component of any basement waterproofing system. It is a device that collects water from the basement and pumps it away from your home to prevent water damage and mold growth. Here is a step-by-step guide on how to install a sump pump in your basement:
Materials Needed:
- Sump pump
- PVC pipe and fittings
- Check valve
- Gravel
- Concrete or mortar mix
- Screwdriver
- Hammer
- Handsaw or PVC cutter
- Tape measure
- Level
- Safety goggles
- Gloves
Step 1: Choose the location Choose a location for the sump pump in the lowest part of the basement where water tends to collect. This location should be at least 6 inches away from the walls and should have an electrical outlet nearby.
Step 2: Dig the sump pit Dig a hole in the chosen location that is at least 2 feet deep and wide enough to accommodate the sump pump. The hole should be deep enough to reach below the basement floor. Use a level to make sure that the hole is even.
Step 3: Install the liner Place the liner in the hole and make sure it is level. The liner should be large enough to accommodate the sump pump and leave enough space around it for gravel.
Step 4: Install the gravel Fill the bottom of the liner with a layer of gravel to ensure proper drainage.
Step 5: Install the check valve Attach the check valve to the PVC pipe using a screwdriver. The check valve should be installed in such a way that it prevents water from flowing back into the sump pit.
Step 6: Install the PVC pipe Attach the PVC pipe to the check valve and run it up and out of the basement. Make sure that the PVC pipe is secured with fittings and is sloped away from the house to ensure proper drainage.
Step 7: Install the sump pump Place the sump pump into the liner and ensure that it is level. Connect the sump pump to the PVC pipe using the appropriate fittings.
Step 8: Install the lid Place the lid on the liner and make sure it fits snugly. The lid should have a vent to allow for proper air circulation.
Step 9: Install the discharge pipe Connect the discharge pipe to the PVC pipe and run it to a safe location away from the house, such as a storm drain or dry well.
Step 10: Test the sump pump Plug in the sump pump and pour water into the pit to test its functionality. The pump should turn on and pump out the water.
Step 11: Seal the hole Fill the hole with concrete or mortar mix and smooth the surface. Allow the concrete to dry for at least 24 hours before walking on it.
In conclusion, sump pump installation is a crucial part of basement waterproofing. It is a simple process that can be done by a DIY enthusiast or a professional contractor. By following these steps, you can ensure that your sump pump is installed correctly and provides adequate protection for your home.
-
What Is The Category And Classes Of Water Damage?


Category 3 Class 4 Water Damage Loss If you have had water damage and need to know What Is The Category And Classes Of Water Damage? Then the following should help you
Water damage can be classified into different categories based on the type of water involved and the level of contamination. The three main categories of water damage are:
- Category 1 (Clean water): This is water from a clean source such as a broken water supply line or a faucet. It poses no substantial risk from ingestion or exposure.
- Category 2 (Grey water): This is water that has a significant level of contamination and could cause illness or discomfort if ingested. This includes water from washing machines, dishwashers, and toilet overflow with urine (but no feces).
- Category 3 (Black water): This is highly contaminated water that can cause severe illness or even death if ingested. This includes sewage backup, floodwater, and water from natural disasters. This category of water contains harmful toxins, bacteria, and other pathogens.

Category 3 Class 3 Water Damage The severity of water damage can also be classified into four different classes based on the amount of water and the level of saturation:
- Class 1: This is the least severe level of water damage. It involves minimal water absorption, and only a small area is affected.
- Class 2: This level of water damage involves a significant amount of water absorption, and the damage has spread to a larger area.
- Class 3: This level of water damage involves the most significant amount of water absorption, and the damage has affected the entire room, including walls and ceilings.
- Class 4: This is the most severe level of water damage. It involves deep saturation and may require specialty drying equipment to prevent further damage. This level of water damage may also require the removal of wet materials such as carpet, drywall, and insulation.
-
What Is A DOP Test
A DOP test, which stands for “Dispersed Oil Particle” test, is a method used in water damage restoration to assess the effectiveness of cleaning and decontamination efforts.
Sewage Cleanup Experts In a DOP test, a device called a photometer is used to measure the concentration of airborne particles in a given area before and after the restoration process. The particles used in the test are tiny oil droplets, which are dispersed into the air and then measured by the photometer.

Sewage Cleanup The goal of the DOP test is to determine the level of cleanliness achieved after the restoration process. The test measures the number and size of particles in the air, which can indicate the presence of contaminants such as mold, bacteria, or other harmful substances.
The results of the DOP test can help to ensure that the restoration process has effectively removed any contaminants and that the air quality in the affected area is safe. This test is often required in situations where the water damage has caused significant contamination, such as in sewage backups or flooding from contaminated water sources.


Dont Let Water Damage Destroy Your House
Call For An Inspection: (859)302-2702
We Servere:
Lexington, Kentucky
Richmond,Kentucky
Newby,Kentucky
Nicholasvillle,Kentucky
Georgetown, Kentucky
Winchester, Kentucky
Follow Me On
Subscribe To My Newsletter
Subscribe for new travel stories and exclusive content.
